
个人知识库
个人知识库
Obsidian
使用
vuepress-theme-hope搭建 文档系统作为 个人知识库
部署脚本: https://lovelijunyi.gitee.io/posts/169.html
安装:https://bornforthis.cn/1v1/18-Jason/03.html
官网:https://theme-hope.vuejs.press/zh/
https://zhuanlan.zhihu.com/p/494269087
https://blog.csdn.net/weixin_43711004/article/details/126962196
https://www.cnblogs.com/shaozelong/p/16988680.html
部署上线: https://blog.csdn.net/goodProgramer/article/details/112345149
博客源码:
https://github.com/Mister-Hope/Mister-Hope.github.io
https://gitee.com/xt-gitee/mynotes
安装
npm init vuepress-theme-hope@next my-docs
npm init vuepress-theme-hope my-docs
项目命令
package.json
{
  "scripts": {
    "docs:build": "vuepress build src",
    "docs:clean-dev": "vuepress dev src --clean-cache",
    "docs:dev": "vuepress dev src"
  }
}
启动命令
npm run docs:dev
使用组件
全局导入 Vue 组件
根据组件文件或目录自动注册 Vue 组件。
npm i -D @vuepress/plugin-register-components@next
"@vuepress/client": "2.0.0-beta.53",
"@vuepress/plugin-register-components": "^2.0.0-beta.51",
"@vuepress/plugin-search": "^2.0.0-beta.53",
"element-plus": "^2.2.25",
"vue": "^3.2.45",
"vuepress": "2.0.0-beta.53",
"vuepress-theme-hope": "2.0.0-beta.130"
plugin-search 这个插件只能实现文章查找,最后的显示结果由文章列表组成,不能实现全文搜索。
npx vuepress info
useRouteLocale() is called without provider.
yarn add -D @vuepress/plugin-search
yarn add -D @vuepress/@sass-palette/hope-config
全文搜索
1. vuepress-plugin-search-pro 搜索
通过 vuepress-plugin-search-pro 设置 indexContent: true 实现全文搜索
npm i -D vuepress-plugin-search-pro
// .vuepress/config.ts
import { searchProPlugin } from "vuepress-plugin-search-pro";

export default {
  plugins: [
    searchProPlugin({
      // 配置选项
         indexContent: true, // 默认情况下,插件只会索引页面的标题和摘要以及你的自定义索引项,不会索引页面的正文内容。如果需要索引页面的正文内容,可以将该选项设置为 true。
    }),
  ],
};
2. Algolia DocSearch 搜索
其他
使用:
VuePress 2.0 中使用 Algolia DocSearch 文档搜索功能的配置 | ImCaO's Blog
搜索
Vuepress配置全文搜索插件fulltext-sarch | 二丫讲梵 (eryajf.net)
http://www.manongjc.com/detail/62-lbqpntwnmfrkbsx.html
https://zhuanlan.zhihu.com/p/369923082
https://blog.sofineday.com/vuepress-fulltext-search.html#通过插件-vuepress-plugin-fulltext-search-实现全文搜索
https://www.cnblogs.com/pengchenggang/p/15713929.html
https://blog.csdn.net/weixin_55475226/article/details/123363042
https://blog.sofineday.com/vuepress-fulltext-search.html#集成第三方免费搜索服务-algolia
其他
出现跨域异常
使用 gitee pages 部署 出现跨域异常
src/.vuepress/config.ts 文件中修改
// /notes_book_docs/是博客的根目录,同样也得是gitee仓库的名字
"base": "/notes_book_docs/"
使用记录
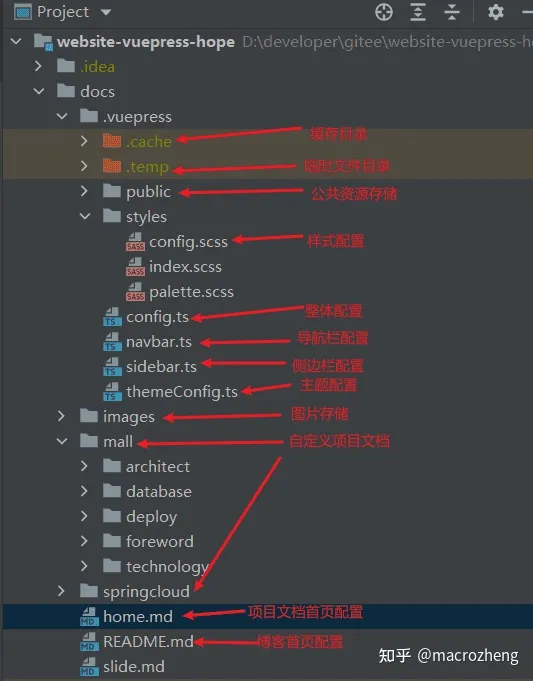
图标库设置
本地iconfont文件位置
.vuepress/public/iconfont/iconfont.css
// iconAssets: '/iconfont/iconfont.css', 可以指定本地iconfont文件
iconAssets: ['/iconfont/iconfont.css','//at.alicdn.com/t/c/font_4063270_fk8t8tiuwa.css'],
iconPrefix:'iconfont ', // 设置的图标前缀 这里指定,否则在使用时就需要  iconfont icon-<ICON-NAME>
在 Markdown 中添加图标
你可以使用 <HopeIcon /> 组件在 markdown 中添加图标。
icon属性接受与其他icon选项相同的内容,即:字体类名和图像 urlcolor属性接受一个 css 颜色值,它将用作图标颜色(可选)size属性接受一个 css 大小值,该值将用作图标大小(可选)
例如:
copyright 开启复制文章,加入版权信息
.vuepress/theme.ts
plugins: {
    copyright: {                 // 开启复制文章,加入版权信息
        author: "lihuan",       // 作者
        license: "", // 许可证
        triggerLength: 50,         // 触发附加版权的最小内容长度
        global: true,              // 开启全局,允许在页面的 frontmatter 中单独设置 copy: false 禁用
    },
}
菜单
- navbar:导航栏
- sidebar:侧边栏
左侧菜单,显示的名称,是md的一级标题(所以需要保证只有一个一级标题,否则可能路由跳转会异常)
目前菜单分为3中类型
以文档内容为侧边栏目录
    {
      text: "文档",
      icon: "note",
      prefix: "guide/",
      children: "structure",
    },
分组
"/notes/java/java/": [
    "java基础",// "/notes/java/java/java基础.md"
    "java开发记录",
  ],
 "/notes/java/": [
    {
      // 必要的,分组的标题文字
      text: "java基础",
      icon: "icon-java1",
      prefix: "java/",
      // 可选的, 设置分组是否可以折叠,默认值是 false,
      collapsible: true,
      // 必要的,分组的子项目
      children: [
         "",
        "java基础",
        "java开发记录","github", "Hibernate-Validator数据校验框架", "JAVA_IO", "java开发记录", "java环境安装", "maven", "Netty", "springBoot", "springCloud"
      ],
    },
    {
      // 必要的,分组的标题文字
      text: "Activiti",
      icon: "icon-liucheng",
      prefix: "Activiti/",
      // 可选的, 设置分组是否可以折叠,默认值是 false,
      collapsible: true,
      // 必要的,分组的子项目
      children: [
        "Activiti", "Activiti_6", "Activiti数据库设计", "Activiti_使用"
      ],
    },
  ],
拓展记录
1. 使用element-plus 组件
就目前了解的方式,应该是有2种使用方式(chatGPT 给出的答案)
- 组件的组件使用
- 在 Markdown 页面中使用 Element Plus 的组件
第一种实现:编写自己的组件时使用 Element Plus(目前确认能实现)
1.安装element
npm install element-plus --save-dev
2. 在 .vuepress文件夹下添加 client.ts文件
// .vuepress/client.ts
// 客户端增强配置文件-https://v2.vuepress.vuejs.org/zh/guide/migration.html#%E7%BA%A6%E5%AE%9A%E6%96%87%E4%BB%B6%E5%8F%98%E6%9B%B4
import { defineClientConfig } from "@vuepress/client";
import ElementPlus from "element-plus";
import "element-plus/dist/index.css";

export default defineClientConfig({
  enhance: ({ app, router, siteData }) => {
    // 引入Element-plus组件库
    // 【引入的主要目的不是在MD文档中使用Element的组件,主要是为了编写自己的组件】
    // 【自己写的组件被registerComponentsPlugin插件引入全局在进行使用】
    app.use(ElementPlus);
  },
});
第二种实现
目前没验证过
安装 Element Plus
在终端中进入您的 VuePress 项目目录,并执行以下命令来安装 Element Plus 包:
install element-plus --save-dev这将会在您的项目中添加 Element Plus 的依赖。
在主题中引入 Element Plus 样式和组件
您可以在
.vuepress/theme/index.js文件中引入 Element Plus 的样式文件和组件。例如,您可以按照以下方式进行配置:module.exports = { async ready() { const { setVuePressThemeDefaultConfig } = require('vuepress-theme-hope/src/node') // 引入 Element Plus 的样式文件 require('element-plus/lib/theme-chalk/index.css') // 引入 Element Plus 的组件 const ElButton = require('element-plus/lib/button').default setVuePressThemeDefaultConfig({ plugins: [ // 注册 Element Plus 插件 [ 'element-plus', { components: { ElButton, }, }, ], ], }) }, }在上述代码中,我们使用
require函数引入了 Element Plus 的 CSS 样式文件和ElButton组件。然后,我们在plugins配置项中注册了 Element Plus 的插件,并在其中指定了要注册的组件。这样,VuePress 就会将 Element Plus 转换为可用的组件。在页面中使用 Element Plus 组件
现在,您可以在您的 VuePress 页面中使用 Element Plus 的组件了。例如,在 Markdown 页面中使用
ElButton组件的示例代码如下:<template> <div> <el-button type="primary">默认按钮</el-button> </div> </template>在上述示例中,我们使用
type属性来指定按钮类型为primary,这将使该按钮显示为蓝色。
2. 全局挂载/使用
下面以 LeanCloud数据库为例:
.vuepress/client.ts 目录下
// .vuepress/client.ts
import { defineClientConfig } from "@vuepress/client";
import { ui_rmd_menu } from './public/data/commonMenuData'


export default defineClientConfig({
  enhance: ({ app }) => {
      app.config.globalProperties.$ui_rmd_menu = ui_rmd_menu;// 挂载 ui_rmd_menu 对象

  },
});
使用
可以直接在md中使用下面的代码
<script setup lang="ts">
    import { getCurrentInstance   } from "vue";
    const { proxy }: any = getCurrentInstance()
    console.log('proxy:', proxy)
    console.log('$ui_rmd_menu:', proxy.$ui_rmd_menu);// 调用 挂载的全局变量

</script>
3. 使用vuex和 路由
以项目中 记录常用菜单为例
3.1 安装
npm i vuex vue-router -S
3.2 添加.vuepress/router.js 文件
在 router.js 文件中,你设置了路由守卫以更新页面点击次数,并将其存储在 Vuex Store 中。
export default ({ router, store }) => {
    // 路由守卫:更新页面点击次数
    router.beforeEach((to, from, next) => {
        console.log(to)
        console.log(store.getters.popularPages);
        store.commit('SET_PAGE_COUNT', to.path);
        next();
    });
};
3.3 添加.vuepress/store.js 文件
在 store.js 文件中,你定义了一个 popularPages Getter,它通过过滤、排序和筛选来计算出常用页面的列表,并将其存储在状态管理中
import Vuex from 'vuex'
export default new Vuex.Store({
    state: {
        pageCountMap: (typeof window !== 'undefined') ? JSON.parse(window.localStorage.getItem('pageCountMap')) || {} : {}
    },
    mutations: {
        SET_PAGE_COUNT (state, pathItem) {
            const key = pathItem.path
            if (state.pageCountMap[key]) {// 说明当前path 已经缓存过,点击次数+1
                state.pageCountMap[key].count++
            } else {
                state.pageCountMap[key] = {
                    path: pathItem.path,
                    name: pathItem.meta.t,
                    count: 1
                }
            }
            if (typeof window !== 'undefined') {
                window.localStorage.setItem('pageCountMap', JSON.stringify(state.pageCountMap))
            }
            // state.pageCountMap[path] = (state.pageCountMap[path] || 0) + 1;
        },
    },
    getters: {
        popularPages (state) {
            // let pageCountMap = {};
            // if (typeof window !== 'undefined') {
            //     pageCountMap = JSON.parse(localStorage.getItem('pageCountMap')) || {}
            // }else{
            //     pageCountMap = state.pageCountMap
            // }
            const pageList = Object.entries(state.pageCountMap) // 将对象转换为键值对数组
            const arr = pageList
                .filter(([path,  count]) => path !== '/') // 过滤掉首页和 name 为空的项
                .sort((a, b) => b[1].count - a[1].count) // 按照点击次数倒序排序
                .slice(0, 20) // 只取前20个
            const menuArr = arr.map(([_, item]) => item)
                .filter(({name}) => !!name);
            return menuArr;
        },
    },
})
2.4 在 client.ts 文件中,你使用 routerMixin 函数将路由守卫和状态管理绑定到 VuePress 应用程序中。
添加.vuepress/client.ts文件
// 客户端增强配置文件-https://v2.vuepress.vuejs.org/zh/guide/migration.html#%E7%BA%A6%E5%AE%9A%E6%96%87%E4%BB%B6%E5%8F%98%E6%9B%B4
import { defineClientConfig } from "@vuepress/client";
import ElementPlus from "element-plus";
import "element-plus/dist/index.css";
import store from './store';
import routerMixin from './router';

export default defineClientConfig({
  enhance: ({ app, router, siteData }) => {
    // 引入Element-plus组件库
    // 【引入的主要目的不是在MD文档中使用Element的组件,主要是为了编写自己的组件】
    // 【自己写的组件被registerComponentsPlugin插件引入全局在进行使用】
    app.use(ElementPlus).use(store);
      // 传入 router 和 store 对象,执行路由守卫代码
      app.config.globalProperties.$store = store; // 挂载 store
      routerMixin({ router:router, store }); // 执行路由守卫
  },
});
自定义组件支持scss
<style scoped lang="scss">
4. 自定义组件使用
以首页使用快速导航栏为例,卡片是自定义组件,并且将数据提取作为公共js对象,通过导入全局变量使用(变量的使用,目前总共2种方式)
- 通过vuex 共享全局变量
- 直接引入
案例:首页计划是存放一些常用的导航推荐,并且加上常用菜单
实现步骤:
1. 自定义组件
https://vuejs.press/zh/reference/plugin/register-components.html
https://theme-hope.vuejs.press/zh/cookbook/customize/component.html
// src/.vuepress/config.ts
import {defineUserConfig} from "vuepress";
import theme from "./theme.js";
import { registerComponentsPlugin } from '@vuepress/plugin-register-components'
import { getDirname, path } from '@vuepress/utils'
// @ts-ignore
const __dirname = getDirname(import.meta.url)
export default defineUserConfig({
    plugins: [
        registerComponentsPlugin({
            // components: {
            //     FooBar: path.resolve(__dirname, './components/FooBar.vue'), // 用于替换
            // },
            componentsDir: path.resolve(__dirname, './components');// 指定 src/.vuepress/components
        })
    ],
});
componentsDir
类型:
string | null默认值:
null详情:
组件目录的绝对路径。
该目录下匹配 componentsPatterns 的文件会被自动注册为 Vue 组件。
2. 编写导航组件
3. 定义变量
将导航菜单提出放到一个js对象中全局维护,这样数据会纯粹一点
src/.vuepress/public/data/commonMenuData.ts
/**
* 目前快速导航对象总共有五个属性
* 1. img:网站图标(可无)
* 2. name:网站名称(必填,在没有 img和iconFont 属性时,用 name的第一个字符作为 网站的图标)
* 3. description:网站说明(必填)
* 4. url:网站url地址(必填)
* 5. tag:卡片右上角 标签,主要用于描述 该网站 为 官网,防止 相同的网站很多,需要哦区分开
* 6. iconFont 计划作为 替代 img的,
*
*/
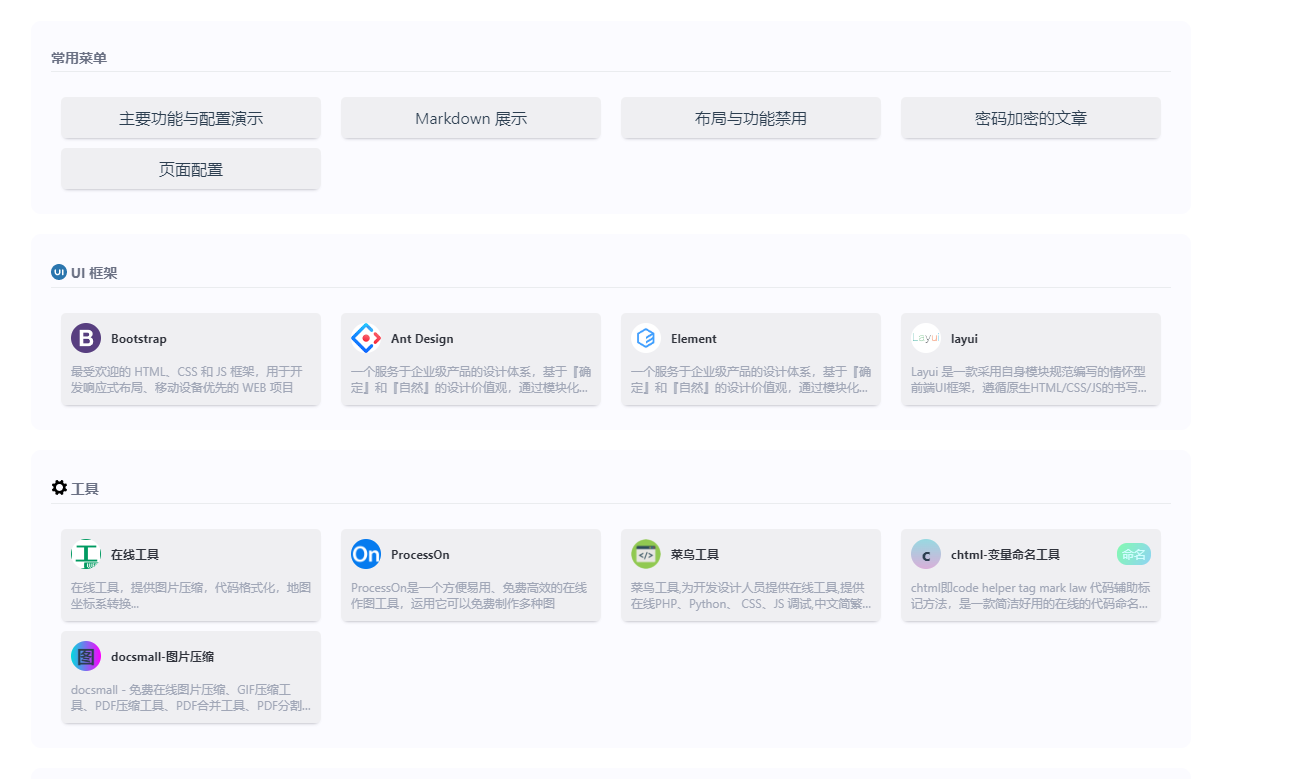
// UI 框架 罗列的导航网站 https://c.runoob.com/web-developer/
export const ui_rmd_menu = [
{
img: '/images/home/Bootstrap-icon.jpg',
name: 'Bootstrap',
description: '最受欢迎的 HTML、CSS 和 JS 框架,用于开发响应式布局、移动设备优先的 WEB 项目',
'url': 'http://v3.bootcss.com/'
},
{ img: '/images/home/Ant.Design.png', name: 'Ant Design', description: '一个服务于企业级产品的设计体系,基于『确定』和『自然』的设计价值观,通过模块化的解决方案,让设计者专注于更好的用户体验','url': 'https://ant.design/index-cn' },
{
img: '/images/home/element.jpg',
name: 'Element',
description: '一个服务于企业级产品的设计体系,基于『确定』和『自然』的设计价值观,通过模块化的解决方案,让设计者专注于更好的用户体验',
url: 'http://element-cn.eleme.io/#/zh-CN'
},
{
img: '/images/home/layui.jpg',
name: 'layui',
description: 'Layui 是一款采用自身模块规范编写的情怀型前端UI框架,遵循原生HTML/CSS/JS的书写与组织形式,门槛极低,拿来即用',
url: 'http://www.layui.com/'
}
]
4. 全局变量的使用
4.1 在 client.ts 文件中 将 上面定义的变量 挂载全局
// .vuepress/client.ts

// 客户端增强配置文件-https://v2.vuepress.vuejs.org/zh/guide/migration.html#%E7%BA%A6%E5%AE%9A%E6%96%87%E4%BB%B6%E5%8F%98%E6%9B%B4
import { defineClientConfig } from "@vuepress/client";
import ElementPlus from "element-plus";
import "element-plus/dist/index.css";
import store from './store/store';
import routerMixin from './router/router';
import { ui_rmd_menu , chartLibrary,web_study,java_study,tool_rmd_menu,api_tool ,css_tool, other_rmd_menu } from './public/data/commonMenuData'
export default defineClientConfig({
  enhance: ({ app, router, siteData }) => {
    // 引入Element-plus组件库
    // 【引入的主要目的不是在MD文档中使用Element的组件,主要是为了编写自己的组件】
    // 【自己写的组件被registerComponentsPlugin插件引入全局在进行使用】
    app.use(ElementPlus).use(store);
      // 传入 router 和 store 对象,执行路由守卫代码
      app.config.globalProperties.$store = store; // 挂载 store
      app.config.globalProperties.$router = router; // 挂载 router
      app.config.globalProperties.$rmd_menu = {...{'ui':ui_rmd_menu},...{'chartLibrary':chartLibrary},...{'web_study':web_study},...{'java_study':java_study},...{'tool':tool_rmd_menu},...{'css_tool':css_tool},...{'api_tool':api_tool},...{'other':other_rmd_menu}};
      routerMixin({ router:router, store }); // 执行路由守卫
  },
});
4.2 通过引入变量,使用全局变量
指定
@NavCardMenuData对应"./public/data/commonMenuData.ts"下的js 文件
// .vuepress/config.ts

    alias: {
        "@theme-hope/modules/blog/components/BlogHero": path.resolve( __dirname, "./components/BlogHero.vue"),/*替换 博客首页*/
       '@theme-hope/components/NormalPage': path.resolve(__dirname, './components/NormalPage.vue'),
       "@NavCardMenuData": path.resolve(__dirname, "./public/data/commonMenuData.ts"),  // 博客首页,推荐菜单
    }
在需要的md文件中
<NavCard title="UI 框架" icon="icon-uicn" :cards="ui_rmd_menu" />

<script setup lang="ts">
import {ui_rmd_menu} from "@NavCardMenuData";
</script>
4.5. 调用
<QuickAccessCard />

<NavCard title="UI 框架" icon="icon-uicn" :cards="$rmd_menu.ui" />
云数据库的使用
1. 初始化LeanCloud数据库
// .vuepress/client.ts
import { defineClientConfig } from "@vuepress/client";

import AV from 'leancloud-storage';
// 初始化 LeanCloud SDK
AV.init({
    appId: '47ldhKIDeDK2V3Ae4tnj9qIk-gzGzoHsz',
    appKey: 'sXOILFKBZZvKWMfQHRiCABNA',
    serverURL: "https://47ldhkid.lc-cn-n1-shared.com",
})


export default defineClientConfig({
  enhance: ({ app }) => {
      app.config.globalProperties.$av = AV; // 挂载AV (LeanCloud 云数据库)
  },
});
考虑到后期需要对数据进行一些操作,所以讲涉及到 LeanCloud 的部分封装出去
2 封装 LeanCloud 相关数据库操作(=============================待完善)
创建.vuepress/utils/leancloud.ts
import AV from 'leancloud-storage';
// https://console.leancloud.cn/apps
// 初始化 LeanCloud SDK
AV.init({
    appId: '47ldhKIDeDK2V3Ae4tnj9qIk-gzGzoHsz',
    appKey: 'sXOILFKBZZvKWMfQHRiCABNA',
    serverURL: "https://47ldhkid.lc-cn-n1-shared.com",
})

// 数据插入方法
export function insertData(data: any) {
    // 这里是数据插入逻辑,您可以根据需求进行具体实现
    // 示例代码:假设您的数据模型是 TestObject
    const TestObject = AV.Object.extend('TestObject');
    const testObject = new TestObject();
    return testObject.save(data);
}

// 数据查询方法
export function queryData(objectId: any) {
    const commonMenuQuery = new AV.Query("common_menu");
    commonMenuQuery.get(objectId).then((commonMenu) => {
        const type = commonMenu.get("type");
        const content = commonMenu.get("content");
        console.log(type)
        console.log(JSON.parse(content));
        console.log(commonMenu)
    });
}

export default AV;
3. 挂载全局
// .vuepress/client.ts
import { defineClientConfig } from "@vuepress/client";
import AV from './utils/leancloud' //初始化 LeanCloud 数据库

export default defineClientConfig({
  enhance: ({ app }) => {
      app.config.globalProperties.$av = AV; // 挂载AV (LeanCloud 云数据库)
  },
});
全局导入 Vue 组件
https://theme-hope.vuejs.press/zh/cookbook/customize/component.htm
目前自定义的组件都放到
.vuepress/components目录下
目前知道的有3种方式:(前两种都是在 .vuepress/config.ts 中实现)
- 通过
@vuepress/plugin-register-components注册组件 - 在
alias中通过别名的方式 - 通过
ClientConfigFile注册 (在.vuepress/client.ts中实现)
第一种方式/第二种方式
// .vuepress/config.ts
import {defineUserConfig} from "vuepress";
import { getDirname, path } from '@vuepress/utils';
import { registerComponentsPlugin } from '@vuepress/plugin-register-components'
export default defineUserConfig({
    // 其他参数
    plugins: [
        registerComponentsPlugin({
            // 下面这个目前还不确定,是用于替换默认主题,还是 全局导入 Vue 组件
            // components: {
            //     FooBar: path.resolve(__dirname, './components/FooBar.vue'), // 用于替换 单个
            // },
            // 第一种方式: 在这里指定
            // 这步核心:在 .vuepress/components 中定义的vue组件要想全局使用,需要在registerComponentsPlugin 指定
            componentsDir: path.resolve(__dirname, './components')
        })
    ],
    alias: {
        // 方式二: 通过指定别名,这样需要在使用的 文件中 通过   import {NavCard} from "@NavCard"  引入
        "@NavCard": path.resolve(__dirname, "./components/NavCard.vue"),            //自定义卡片组件
    }
});
说明
方式一:通过下面的方式,将整个 .vuepress/components 中的组件全局导入,md文件中就能直接使用
registerComponentsPlugin({
            componentsDir: path.resolve(__dirname, './components')
 })
方式二:通过指定别名,这样需要在使用的 文件中 通过 import {NavCard} from "@NavCard" 引入
 alias: {
        "@NavCard": path.resolve(__dirname, "./components/NavCard.vue"),            //自定义卡片组件
    }
方式三
你可以通过创建 .vuepress/client.ts 手动注册组件。 ====================没验证过
// .vuepress/client.ts
import { defineClientConfig } from "@vuepress/client";
import NavCard from "./NavCard.vue";

export default defineClientConfig({
  enhance: ({ app, router, siteData }) => {
    app.component("NavCard", NavCard);
  },
});
使用本地文件
场景: 目前首页导航菜单推荐,考虑到数据多,所以单独使用js文件存储
目前文件存储位置
./public/data/commonMenuData.ts
目前2种方式拿到本地的js数据文件
将数据全局挂载,
通过
alias创建文件的别名,后面就可直接使用(因为无法使用相对路径进行导入,所以通过别名的方式)
第一种方式:
// .vuepress/config.ts
import {defineUserConfig} from "vuepress";
import { getDirname, path } from '@vuepress/utils';
import { registerComponentsPlugin } from '@vuepress/plugin-register-components'
export default defineUserConfig({
    // 其他参数
    plugins: [
        registerComponentsPlugin({
            // 这步核心:在 .vuepress/components 中定义的vue组件要想全局使用,需要在registerComponentsPlugin 指定
            componentsDir: path.resolve(__dirname, './components')
        })
    ],
    alias: {
        // 博客首页,推荐菜单(这里通过别名定义了该js文件,后面其他页面中就可以直接使用  import {ui_rmd_menu} from "@NavCardMenuData";)
        "@NavCardMenuData": path.resolve(__dirname, "./public/data/commonMenuData.ts"),
    }
});
使用: (需要额外说明的是:可以在Markdown 中使用 Vue 语法)
//xx.md
<NavCard title="UI 框架" icon="icon-uicn" :cards="ui_rmd_menu" />
<script setup lang="ts">
import {ui_rmd_menu} from "@NavCardMenuData";
</script>
第二种:挂载全局使用
.vuepress/client.ts 目录下
// .vuepress/client.ts
import { defineClientConfig } from "@vuepress/client";
import { ui_rmd_menu } from './public/data/commonMenuData'


export default defineClientConfig({
  enhance: ({ app }) => {
      app.config.globalProperties.$ui_rmd_menu = ui_rmd_menu;// 挂载 ui_rmd_menu 对象
  },
});
使用: 直接在 md文件中即可使用,NavCard组件的处理和上面的一样
//xx.md
<NavCard title="UI 框架" icon="icon-uicn" :cards="ui_rmd_menu" />
替换组件
https://theme-hope.vuejs.press/zh/guide/advanced/replace.html
当在 行为选项 中设置
{ custom: true }时,主题将通过@theme-hope别名来引入组件,所以你可以利用这一点来替换主题的任何一个组件。
.vuepress/theme.ts 中设置 { custom: true }
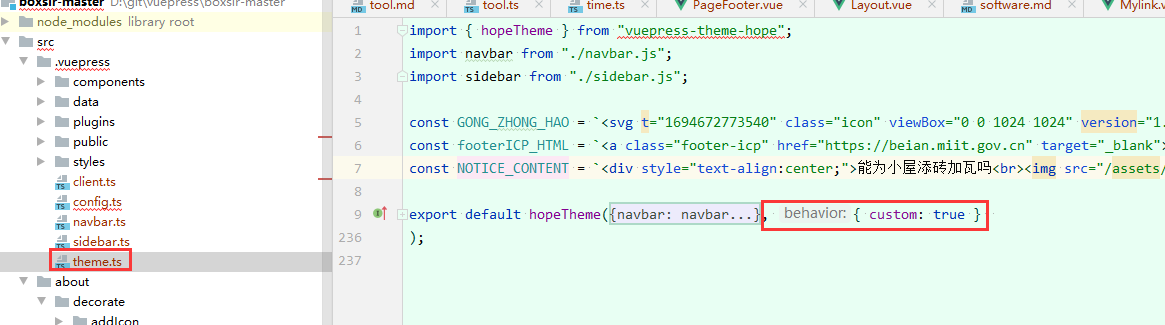
通过 alias 替换主题中使用的组件别名
// .vuepress/config.ts
import { getDirname, path } from "@vuepress/utils";
import { defineUserConfig } from "vuepress";
import { hopeTheme } from "vuepress-theme-hope";
import theme from "./theme.js";

const __dirname = getDirname(import.meta.url);

export default defineUserConfig({
 theme,
  alias: {
      // 目的是利用 tocBefore navbarEndBefore 这 2个插槽 添加自定义的天气组件
    '@theme-hope/components/NormalPage': path.resolve(__dirname, './components/NormalPage.vue'),
    ),
  },
});
天气
结合上面的 替换组件, 通过 NormalPage.vue 替换原来的组件,在tocBefore 插槽中添加 天气组件
<!-- components/NormalPage.vue -->
<template>
    <NormalPage>
        <template v-slot:tocBefore>
            <WeatherPopup/>
        </template>
        <template v-slot:navbarEndBefore>
            <WeatherPopup/>
        </template>
        <slot/>
    </NormalPage>
</template>


<script setup lang="ts">
    import NormalPage from 'vuepress-theme-hope/components/NormalPage'
    import WeatherPopup from './WeatherPopup.vue'
</script>
WeatherPopup.vue
<template>
    <div @click.stop="showWeatherPopup">
        <iframe id="iframe" scrolling="no" :src="'https://tianqiapi.com/api.php?style=ty&skin=cucumber&city='+city" frameborder="0"
                width="300" height="75" allowtransparency="true"></iframe>
        <!-- <iframe width="320" height="85" frameborder="0" scrolling="no" hspace="0" src="https://i.tianqi.com/?c=code&a=getcode&id=6&py=chongqing&icon=1"></iframe> -->

        <el-dialog v-model="dialogVisible" title="" width="30%" >
            <iframe scrolling="no" :src="'https://tianqiapi.com/api.php?style=tw&skin=pitaya&city='+city" frameborder="0" width="100%"
                    height="300px" allowtransparency="true"></iframe>
        </el-dialog>

    </div>

</template>

<script>
    import axios from 'axios'

    export default {
        data() {
            return {
                weather: {},
                city: '合肥',
                dialogVisible:false
            }
        },
        mounted() {
            // 构造 API 请求 URL
            var ipUrl = "https://restapi.amap.com/v3/ip?key=bcc1d8e1b72de9bd3e9ed2561ac10a2b";

            // 向 API 发送 HTTP 请求
            axios.get(ipUrl)
                .then(({data}) => {
                    // 获取 IP 地址对应的城市名称
                    var city = data.city;
                    this.city = city.replace(/市$/, '');
                })
                .catch(error => {
                    console.error(error);
                });

        },
        created() {

        },
        methods: {
            showWeatherPopup() {
                this.dialogVisible = true;
            }
        },
    }
</script>

<style scoped>
    #iframe {
        pointer-events: none;
    }
</style>
博客首页使用自定义组件
参考:https://theme-hope.vuejs.press/zh/guide/advanced/presets.html
目前主要是2快
- 将博客主页的背景替换为每日的必应壁纸。
- 将博客主页的描述替换为随机的一言词句。
为了通过别名替换组件,需要将 { custom: true } 作为第二个选项传入 hopeTheme。
.vuepress/theme.ts
export default hopeTheme({
    hostname: "http://mylishihuan.gitee.io",
    author: {
        name: "lishihuan",
        url: "http://mylishihuan.gitee.io/notes_book_docs/",
    },
    // iconAssets: "iconfont",
    // 静态资源访问,不需要加 public
    iconAssets: '/iconfont/iconfont.css',
},{ custom: true });
必应壁纸
bgImage: https://file.mo7.cc/api/public/bz 目前不知道这个接口的由来,但是他可以获取随机获取必应图纸,可以不用下面的 自定义组件方式
---
home: true
layout: BlogHome
hero: true
bgImage: /blogImage/blog_background2.jpg
bgImage: https://file.mo7.cc/api/public/bz
heroImage: /avatar/head_photo.png
heroText: lihuaun个人笔记
heroFullScreen: true
projects:
  - name: Maven仓库
    link: https://mvnrepository.com/
    desc: Jar包的搜索及下载地址
    icon: link
  - name: B站
    link: https://www.bilibili.com/
    desc: B站
    icon: link
---
自定义组件使用必应壁纸
// .vuepress/config.ts
import { getDirname, path } from "@vuepress/utils";
import { defineUserConfig } from "vuepress";

const __dirname = getDirname(import.meta.url);

export default defineUserConfig({
  // ...

  alias: {
      // 通过自定义的BlogHero.vue 组件替换掉原来的博客首页组件
    "@theme-hope/modules/blog/components/BlogHero": path.resolve(
      __dirname,
      "./components/BlogHero.vue"
    ),
  },
});
在components文件夹下添加BlogHero.vue 覆盖原组件
<!-- .vuepress/components/BlogHero.vue -->
<script setup lang="ts">
import BlogHero from "vuepress-theme-hope/blog/components/BlogHero.js";
import BingHeroBackground from "vuepress-theme-hope/presets/BingHeroBackground.js";
</script>

<template>
  <BlogHero>
    <template #heroBg>
      <BingHeroBackground />
    </template>
  </BlogHero>
</template>
一言描述
来自 theme-hope 主题文档 一言描述
和必应壁纸一样,店铺是替换BlogHero组件
- 博客主页的描述替换为随机的一言词句。
- 一言名句组件"vuepress-theme-hope/presets/HitokotoBlogHero.js"
- 使用方法:覆盖 @theme-hope/modules/blog/components/BlogHero,将上方组件导入原 BlogHero 的 heroInfo 插槽,同时原样传入插槽属性。
// .vuepress/config.ts
import { getDirname, path } from "@vuepress/utils";
import { defineUserConfig } from "vuepress";

const __dirname = getDirname(import.meta.url);

export default defineUserConfig({
  // ...

  alias: {
    "@theme-hope/modules/blog/components/BlogHero": path.resolve(
      __dirname,
      "./components/BlogHero.vue"
    ),
  },
});
<!-- .vuepress/components/BlogHero.vue -->
<script setup lang="ts">
import BlogHero from "vuepress-theme-hope/blog/components/BlogHero.js";
import HitokotoBlogHero from "vuepress-theme-hope/presets/HitokotoBlogHero.js";
</script>

<template>
  <BlogHero>
    <template #heroInfo="heroInfo">
      <HitokotoBlogHero v-bind="heroInfo" />
    </template>
  </BlogHero>
</template>
必应壁纸+一言描述
<!-- .vuepress/components/BlogHero.vue -->
<script setup lang="ts">
    import BlogHero from "vuepress-theme-hope/blog/components/BlogHero.js";
    import BingHeroBackground from "vuepress-theme-hope/presets/BingHeroBackground.js";
    import HitokotoBlogHero from "vuepress-theme-hope/presets/HitokotoBlogHero.js";
    import CustomHeroBackground from "./CustomHeroBackground.vue";

</script>

<template>
    <BlogHero>

        <!--将博客主页的描述替换为随机的一言词句。 -->
        <template #heroInfo="heroInfo">
            <HitokotoBlogHero v-bind="heroInfo"/>
        </template>
         <!--必应壁纸,也可以用替换这个,默认就直接使用必应壁纸 -->
        <template #heroBg>
            <BingHeroBackground />
        </template>
    </BlogHero>
</template>
使用自定义的背景图
<!-- .vuepress/components/BlogHero.vue -->
<script setup lang="ts">
    import BlogHero from "vuepress-theme-hope/blog/components/BlogHero.js";
    import BingHeroBackground from "vuepress-theme-hope/presets/BingHeroBackground.js";
    import HitokotoBlogHero from "vuepress-theme-hope/presets/HitokotoBlogHero.js";
    import CustomHeroBackground from "./CustomHeroBackground.vue";

</script>

<template>
    <BlogHero>
<!-- 使用自定义壁纸-->
       <template #heroBg>
            <custom-hero-background/>
        </template>
        <!--将博客主页的描述替换为随机的一言词句。 -->
        <template #heroInfo="heroInfo">
            <HitokotoBlogHero v-bind="heroInfo"/>
        </template>
    </BlogHero>
</template>
.vuepress/components/CustomHeroBackground.vue 组件,每次加载不同的背景图
<template>
    <div class="hero-bkg" :style="{ 'background-image': 'url(' + gitBkgUrl + ')' }"></div>
</template>

<script>
    /**
     * 自定义 博客首页 背景图
     */
    import fs from "fs";
    import path from "path";
    export default {
        name: 'CustomHeroBackground',
        components: {},
        data () {
            return {
                //壁纸下载:https://wallpaper.ur1.fun/
                bkgUrlList:[
                    '/blogImage/blog_background0.jpg',
                    '/blogImage/blog_background1.jpg',
                    '/blogImage/blog_background2.jpg',
                    '/blogImage/blog_background3.png',
                    '/blogImage/blog_background4.png',
                    '/blogImage/blog_background5.png'
                ]
            }
        },
        // 初始化页面完成后
        mounted () {

        },
        computed: {
            gitBkgUrl() { // 计算属性
                var randomNum = Math.floor(Math.random() * 6);
                console.log(randomNum)
                console.log(this.bkgUrlList[randomNum])
                return this.bkgUrlList[randomNum];
            }
        },
        created () {
        },
        methods: {
            loadData () {

            },
        }
    }
</script>

<style lang="scss" scoped>
    .hero-bkg{
        position: absolute;
        top: 0;
        right: 0;
        bottom: 0;
        left: 0;
        background-repeat:no-repeat;
        /*background-size: 100%100%;*/
        background-size: cover;
        background-position: center;
    }
</style>
主题文件说明
1. 图标
//方式一: 指定本地文件 (.vuepress/public/iconfont/iconfont.css)
iconAssets: '/iconfont/iconfont.css',
// 方式二:iconfont在线链接服务
iconAssets: ['//at.alicdn.com/t/c/font_4063270_szvla3jgl5.css','//at.alicdn.com/t/c/font_4073054_62p3wcbs8z4.css'],
2. 社交媒体
        // 社交媒体
        medias: {
            Email: "mailto:wangyilishihuan@163.com", // 注意邮件的打开方式 mailto:your-email@example.com
            Gitee: "https://gitee.com/mylishihuan",
            GitHub: "https://github.com/ghlishihuan",
            BiliBili: "https://space.bilibili.com/631039613",
            QQ: "http://wpa.qq.com/msgrd?v=3&uin=2413428881&site=qq&menu=yes",
            Wechat: "/assets/otherImg/Wechat.jpg",
        },
异常记录
vuepress-plugin-comment2: i A fallback Waline server is used for demo only. You should provide serverURL option yourself in production.
    // src/.vuepress/theme.ts
    comment: {                  // 评论服务配置
      provider: "Waline",
      serverURL: "https://waline.cailei.site/", /* https://waline-comment.vuejs.press 官方自己的地址,放着备用*/
      copyright: false,                          // 是否显示页脚Waline的版权信息(Powered by Waline v2.15.7)
      reaction: true,                            // 开启反应(你认为这篇文章怎么样?)
    },
本地图片破图
异常描述,点击其他页面后,在返回首页会导致首页的图片都出现破图了,原因是返回首页后 图片的请求url前缀变了
例如: 原本 http://localhost:8080/notes_book/images/home/WebGradients.jpg
当访问
demo文件路径http://localhost:8080/notes_book/demo/ 在返回到首页时图片访问就会出现异常 变为 http://localhost:8080/notes_book/`demo`/images/home/WebGradients.jpg
多出上一次请求的路径,导致图片破图
正确设置图片路径
文件实际位置 my-docs\src\.vuepress\public\images\home\Urbanfonts.png
使用相对路径 /images/home/Urbanfonts.png 切记最前面的需要添加 / 否则会异常
3. config.ts 报错 TS2834
// tsconfig.json
// 修改前
"module": "NodeNext",
"moduleResolution": "NodeNext",

// 修改后
"module": "ESNext",
"moduleResolution": "bundler",
说明
| 配置 | 说明 |
|---|---|
| NodeNext | Node.js 原生 ESM 模式,强制要求导入路径带 .js 扩展名 |
| bundler | Vite/Webpack 等打包工具模式,不要求扩展名,适合 VuePress 项目 |
为什么改 module 也要改?
moduleResolution: "bundler" 需要配合 module: "ESNext" 或 "Preserve" 使用
继续用 NodeNext 的话 TypeScript 会报不匹配的错误
改完后 IDE 重新加载 TS 语言服务(可以关闭再打开文件),TS2834 的报错就会消失。