
uni-app 基础
uni-app 基础
网站:https://hellouniapp.dcloud.net.cn/pages/component/view/view
创建 uni-app 项目方式
uni-app 支持两种方式创建项目:
通过 HBuilderX 创建(需安装 HBuilderX 编辑器)
通过命令行创建(需安装 NodeJS 环境)
HBuilderX 创建 uni-app 项目
创建步骤
1.下载安装 HbuilderX 编辑器
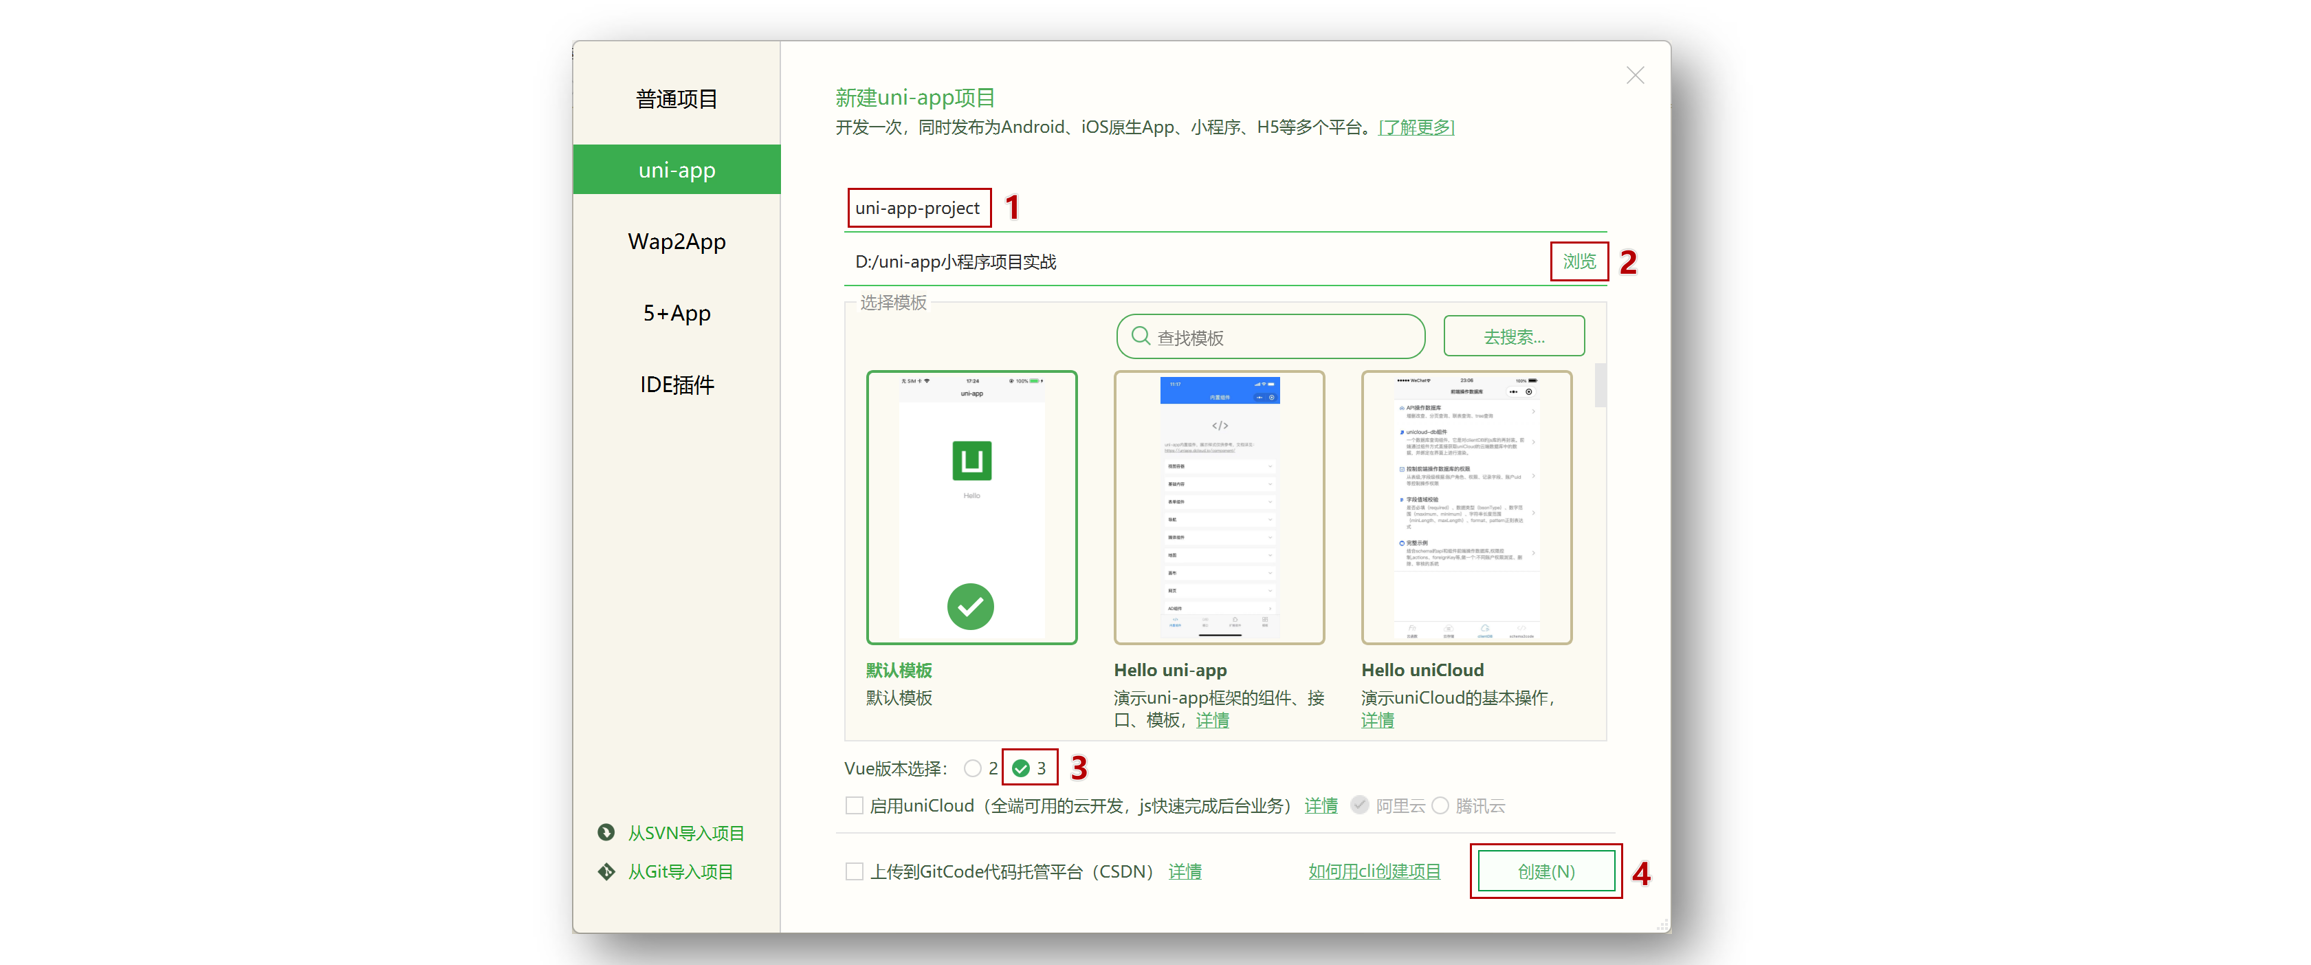
2.通过 HbuilderX 创建 uni-app vue3 项目
3.安装 uni-app vue3 编译器插件

4.编译成微信小程序端代码
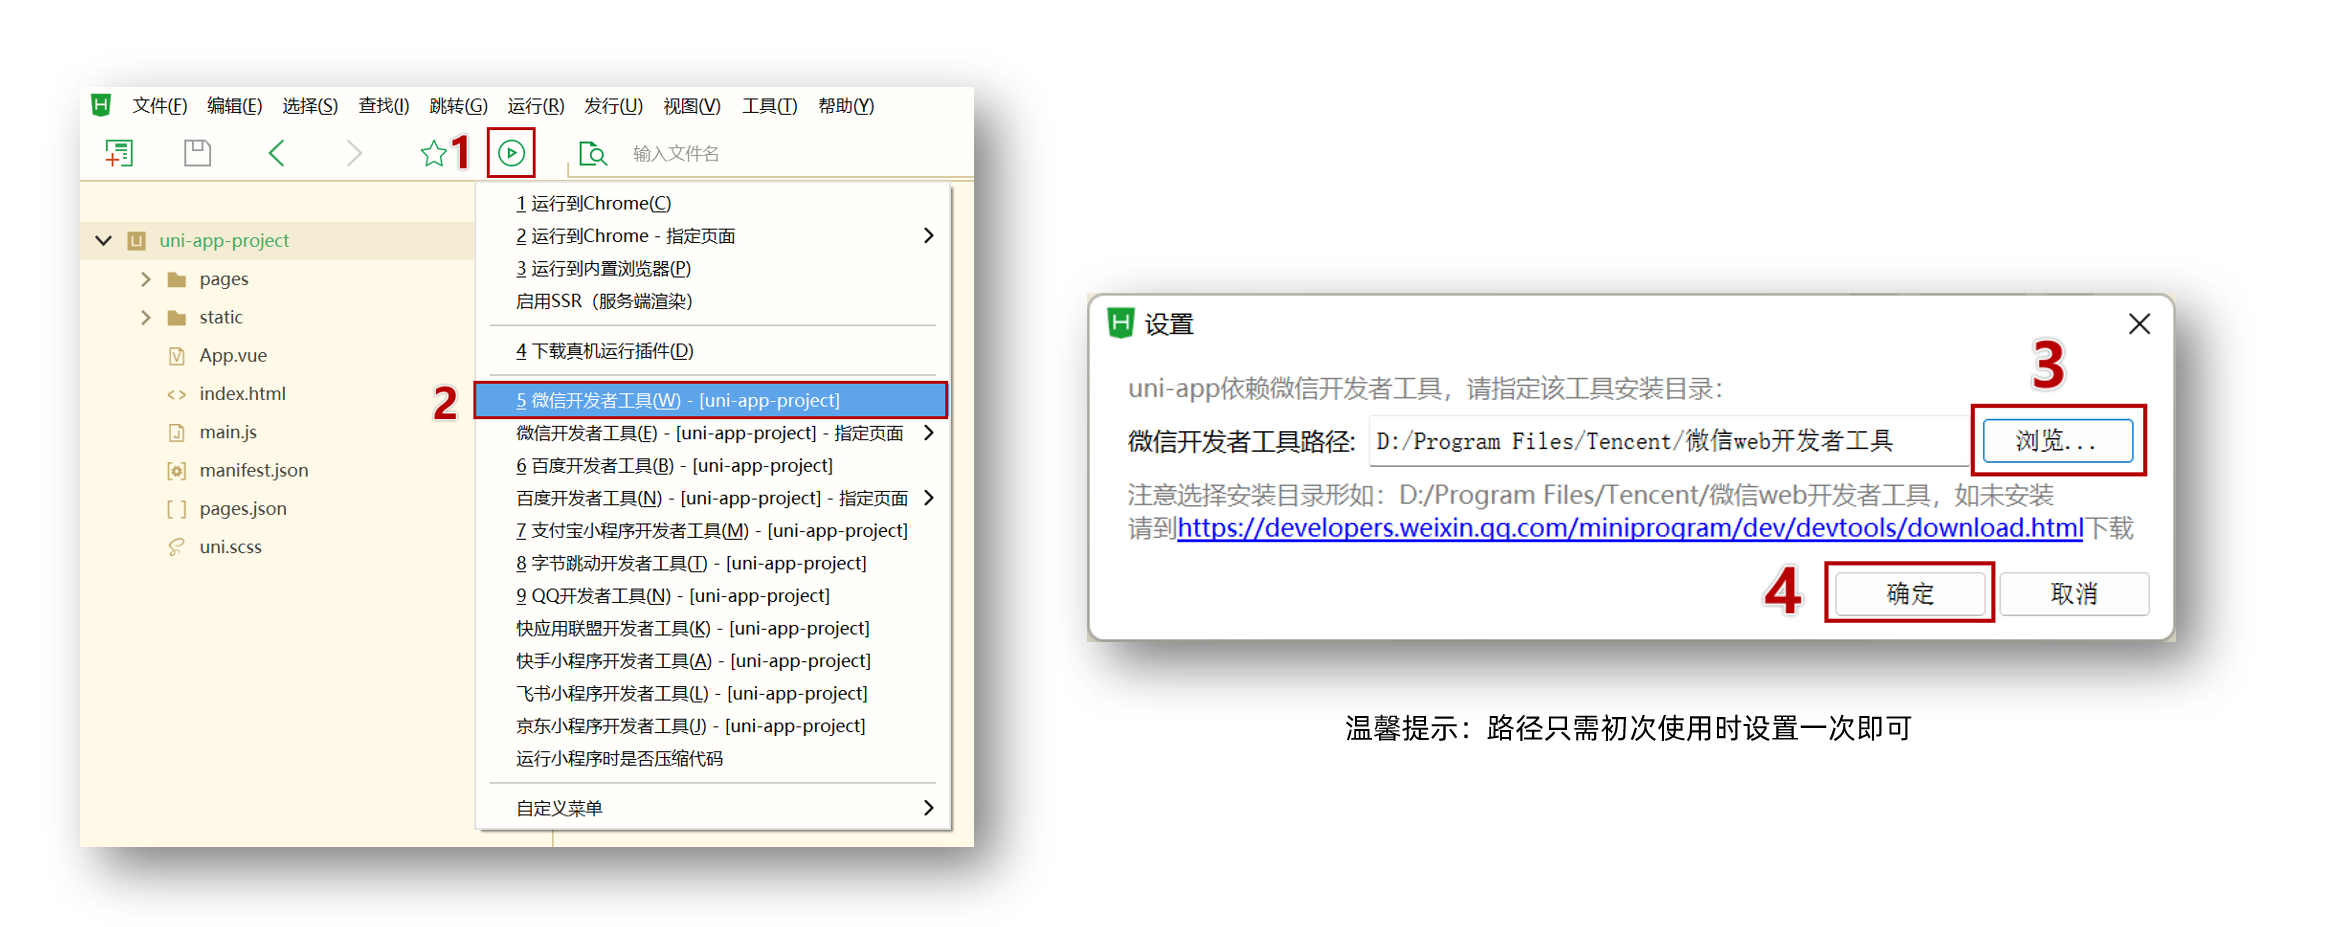
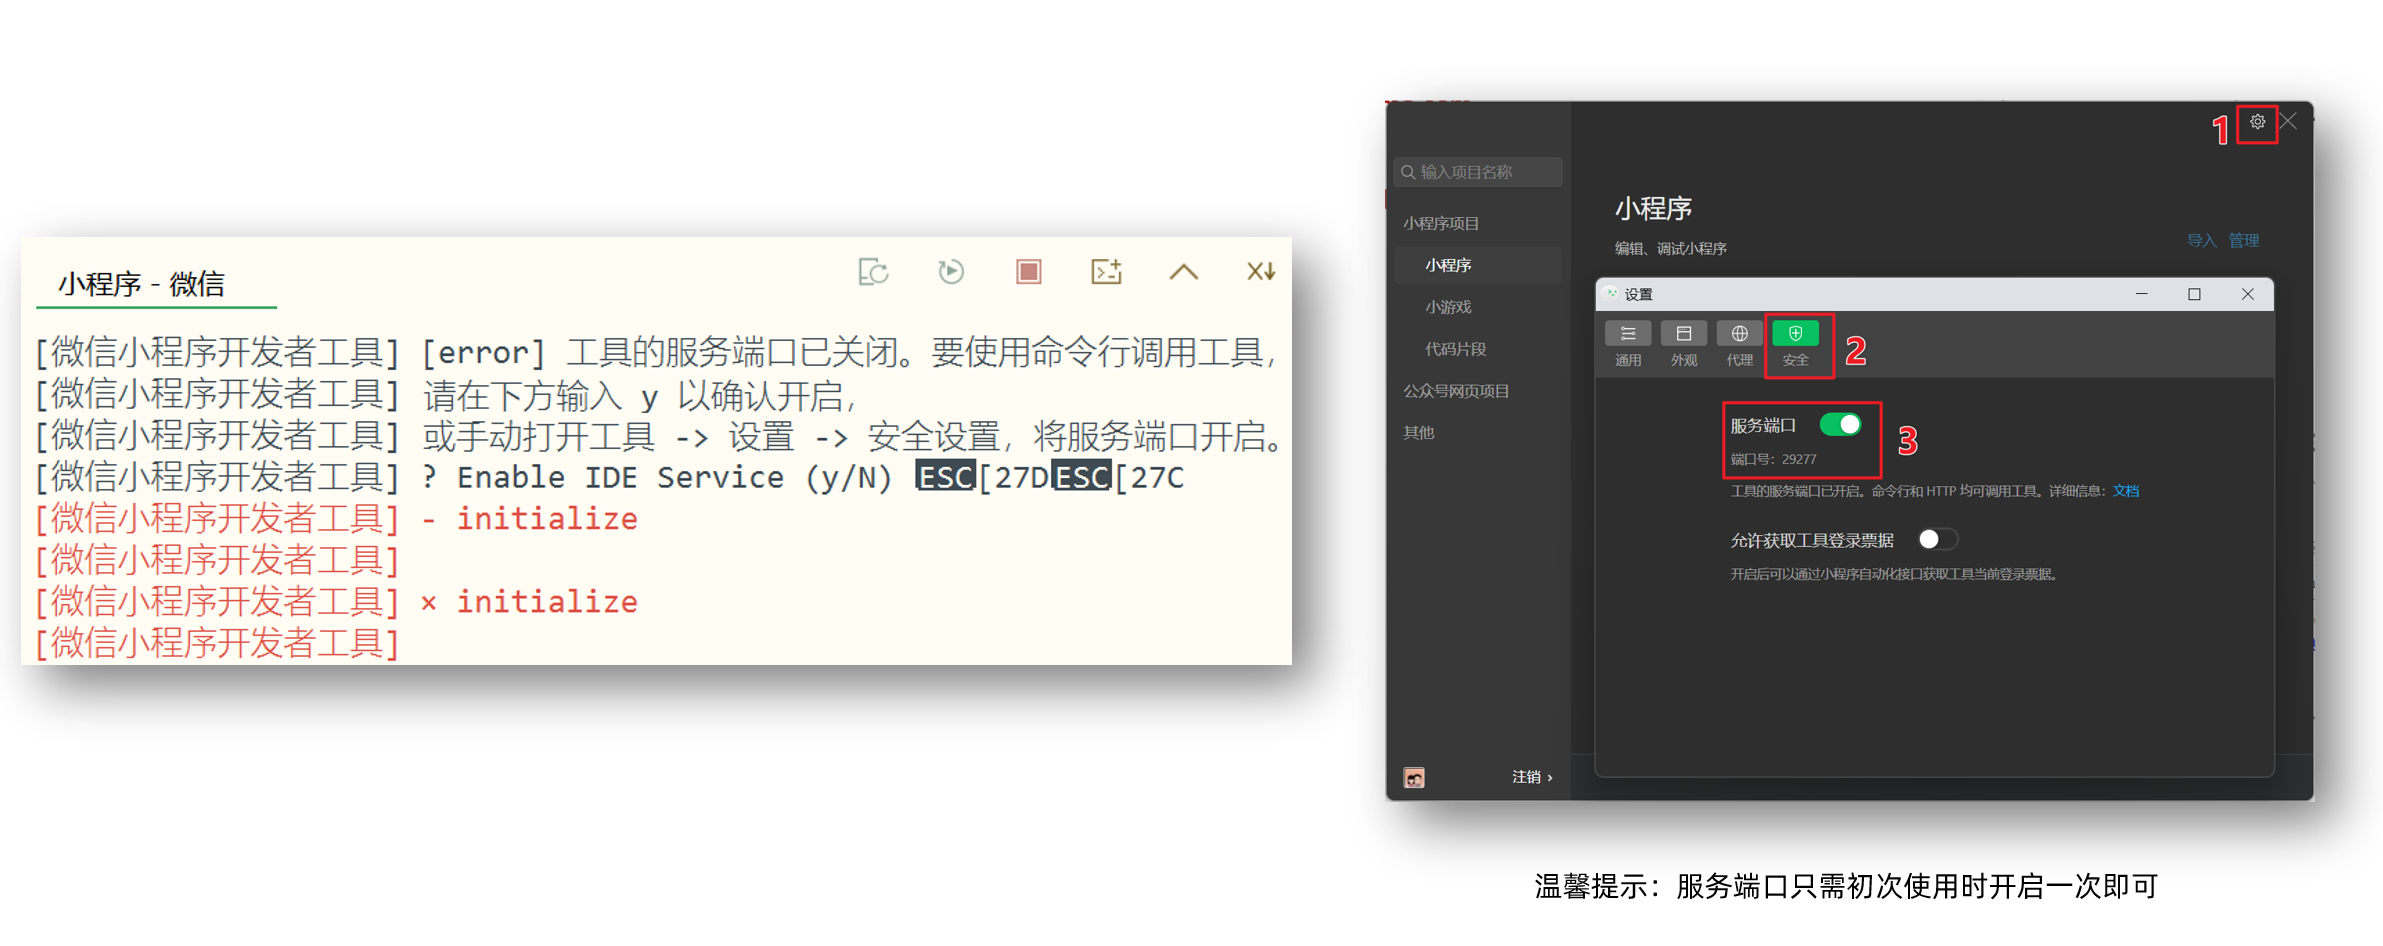
5.开启服务端口
小技巧分享:模拟器窗口分离和置顶

HBuildeX 和 微信开发者工具 关系

pages.json 和 tabBar 案例
目录结构
我们先来认识 uni-app 项目的目录结构。
├─pages            业务页面文件存放的目录
│  └─index
│     └─index.vue  index页面
├─static           存放应用引用的本地静态资源的目录(注意:静态资源只能存放于此)
├─unpackage        非工程代码,一般存放运行或发行的编译结果
├─index.html       H5端页面
├─main.js          Vue初始化入口文件
├─App.vue          配置App全局样式、监听应用生命周期
├─pages.json       **配置页面路由、导航栏、tabBar等页面类信息**
├─manifest.json    **配置appid**、应用名称、logo、版本等打包信息
└─uni.scss         uni-app内置的常用样式变量
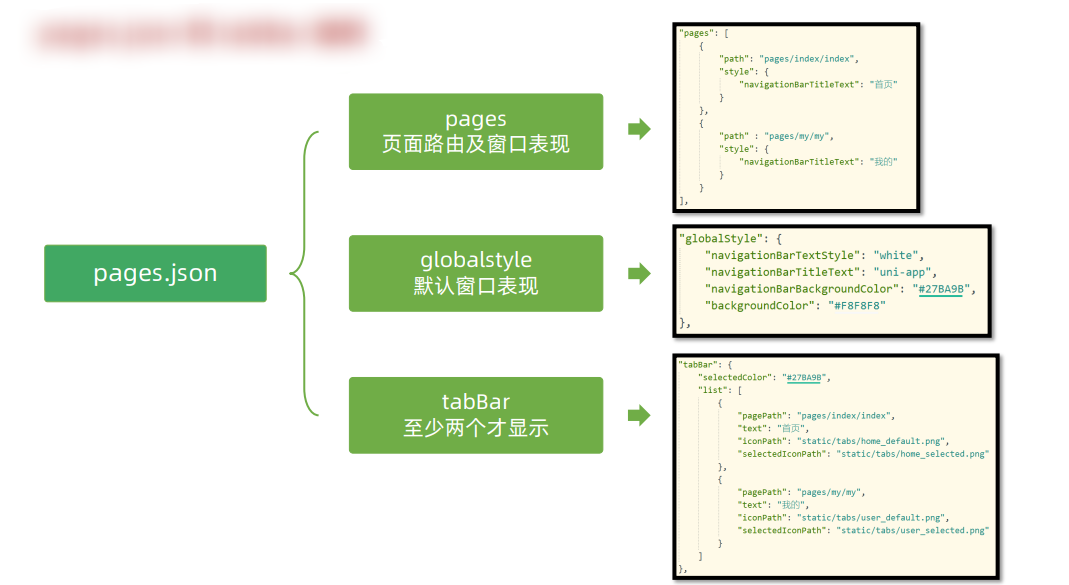
解读 pages.json
用于配置页面路由、导航栏、tabBar 等页面类信息
案例练习
效果预览

参考代码
//pages.json
{
  // 页面路由
  "pages": [
    {
      "path": "pages/index/index",
      // 页面样式配置
      "style": {
        "navigationBarTitleText": "首页"
      }
    },
    {
      "path": "pages/my/my",
      "style": {
        "navigationBarTitleText": "我的"
      }
    }
  ],
  // 全局样式配置
  "globalStyle": {
    "navigationBarTextStyle": "white",
    "navigationBarTitleText": "uni-app",
    "navigationBarBackgroundColor": "#27BA9B",
    "backgroundColor": "#F8F8F8"
  },
  // tabBar 配置
  "tabBar": {
    "selectedColor": "#27BA9B",
    "list": [
      {
        "pagePath": "pages/index/index",
        "text": "首页",
        "iconPath": "static/tabs/home_default.png",
        "selectedIconPath": "static/tabs/home_selected.png"
      },
      {
        "pagePath": "pages/my/my",
        "text": "我的",
        "iconPath": "static/tabs/user_default.png",
        "selectedIconPath": "static/tabs/user_selected.png"
      }
    ]
  }
}
uni-app 和原生小程序开发区别
开发区别
uni-app 项目每个页面是一个 .vue 文件,数据绑定及事件处理同 Vue.js 规范:
属性绑定
src="{ { url }}"升级成:src="url"事件绑定
bindtap="eventName"升级成@tap="eventName",支持()传参支持 Vue 常用指令
v-for、v-if、v-show、v-model等
其他区别补充
- 调用接口能力,建议前缀
wx替换为uni,养成好习惯,支持多端开发。 <style>页面样式不需要写scoped,小程序是多页面应用,页面样式自动隔离。- 生命周期分三部分:应用生命周期(小程序),页面生命周期(小程序),组件生命周期(Vue)
案例练习
主要功能
- 滑动轮播图
- 点击大图预览
参考代码
<template>
  <swiper class="banner" indicator-dots circular :autoplay="false">
    <swiper-item v-for="item in pictures" :key="item.id">
      <image @tap="onPreviewImage(item.url)" :src="item.url"></image>
    </swiper-item>
  </swiper>
</template>

<script>
export default {
  data() {
    return {
      // 轮播图数据
      pictures: [
        {
          id: '1',
          url: 'https://pcapi-xiaotuxian-front-devtest.itheima.net/miniapp/uploads/goods_preview_1.jpg',
        },
        {
          id: '2',
          url: 'https://pcapi-xiaotuxian-front-devtest.itheima.net/miniapp/uploads/goods_preview_2.jpg',
        },
        {
          id: '3',
          url: 'https://pcapi-xiaotuxian-front-devtest.itheima.net/miniapp/uploads/goods_preview_3.jpg',
        },
        {
          id: '4',
          url: 'https://pcapi-xiaotuxian-front-devtest.itheima.net/miniapp/uploads/goods_preview_4.jpg',
        },
        {
          id: '5',
          url: 'https://pcapi-xiaotuxian-front-devtest.itheima.net/miniapp/uploads/goods_preview_5.jpg',
        },
      ],
    }
  },
  methods: {
    onPreviewImage(url) {
      // 大图预览
      uni.previewImage({
        urls: this.pictures.map((v) => v.url),
        current: url,
      })
    },
  },
}
</script>

<style>
.banner,
.banner image {
  width: 750rpx;
  height: 750rpx;
}
</style>
命令行创建 uni-app 项目
优势
通过命令行创建 uni-app 项目,不必依赖 HBuilderX,TypeScript 类型支持友好。
命令行创建 uni-app 项目:
vue3 + ts 版
::: code-group
# 通过 npx 从 github 下载
npx degit dcloudio/uni-preset-vue#vite-ts 项目名称
# 通过 git 从 gitee 克隆下载 (👉备用地址)
git clone -b vite-ts https://gitee.com/dcloud/uni-preset-vue.git
:::
创建其他版本可查看:uni-app 官网
常见问题
- 运行
npx命令下载失败,请尝试换成手机热点重试 - 换手机热点依旧失败,请尝试从国内备用地址下载
- 在
manifest.json文件添加 小程序 AppID 用于真机预览 - 运行
npx命令需依赖 NodeJS 环境,NodeJS 下载地址 - 运行
git命令需依赖 Git 环境,Git 下载地址
编译和运行 uni-app 项目
- 安装依赖
pnpm install - 运行到微信小程序中(目前不知道什么原因,无法使用
npm dev:mp-weixin)
温馨提示
编译成 H5 端可运行 pnpm dev:h5 通过浏览器预览项目。
用 VS Code 开发 uni-app 项目
为什么选择 VS Code?
- VS Code 对 TS 类型支持友好,前端开发者主流的编辑器
- HbuilderX 对 TS 类型支持暂不完善,期待官方完善 👀
用 VS Code 开发配置
👉 前置工作:安装 Vue3 插件,点击查看官方文档
- 安装 Vue Language Features (Volar) :Vue3 语法提示插件
- 安装 TypeScript Vue Plugin (Volar) :Vue3+TS 插件
- 工作区禁用 Vue2 的 Vetur 插件(Vue3 插件和 Vue2 冲突)
- 工作区禁用 @builtin typescript 插件(禁用后开启 Vue3 的 TS 托管模式)
- 禁用 插件
TypeScript Vue Plugin (Volar)
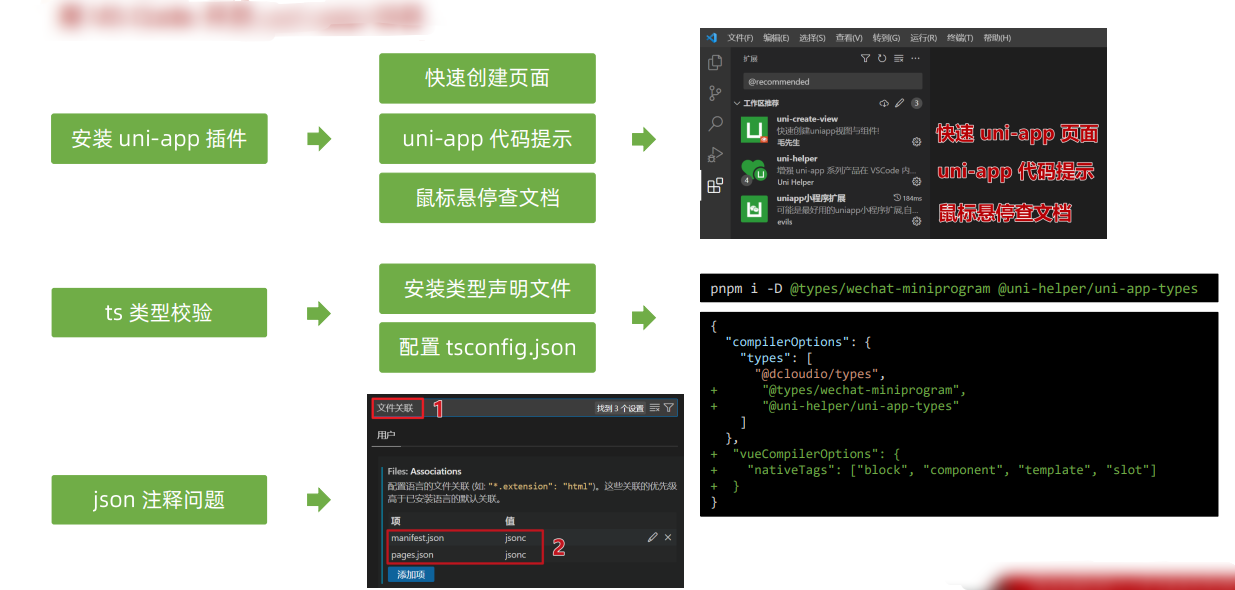
👉 安装 uni-app 开发插件
- uni-create-view :快速创建 uni-app 页面
- uni-helper uni-app :代码提示
- uniapp 小程序扩展 :鼠标悬停查文档
👉 TS 类型校验
- 安装 类型声明文件
pnpm i -D miniprogram-api-typings @uni-helper/uni-app-types - 配置
tsconfig.json
// tsconfig.json { "extends": "@vue/tsconfig/tsconfig.json", "compilerOptions": { "sourceMap": true, "baseUrl": ".", "paths": { "@/*": ["./src/*"] }, "lib": ["esnext", "dom"], // 类型声明文件 "types": [ "@dcloudio/types", // uni-app API 类型 "miniprogram-api-typings", // 原生微信小程序类型 "@uni-helper/uni-app-types" // uni-app 组件类型 ] }, // vue 编译器类型,校验标签类型 "vueCompilerOptions": { // 原配置 `experimentalRuntimeMode` 现调整为 `nativeTags` "nativeTags": ["block", "component", "template", "slot"], // [!code ++] "experimentalRuntimeMode": "runtime-uni-app" // [!code --] }, "include": ["src/**/*.ts", "src/**/*.d.ts", "src/**/*.tsx", "src/**/*.vue"] }- 安装 类型声明文件
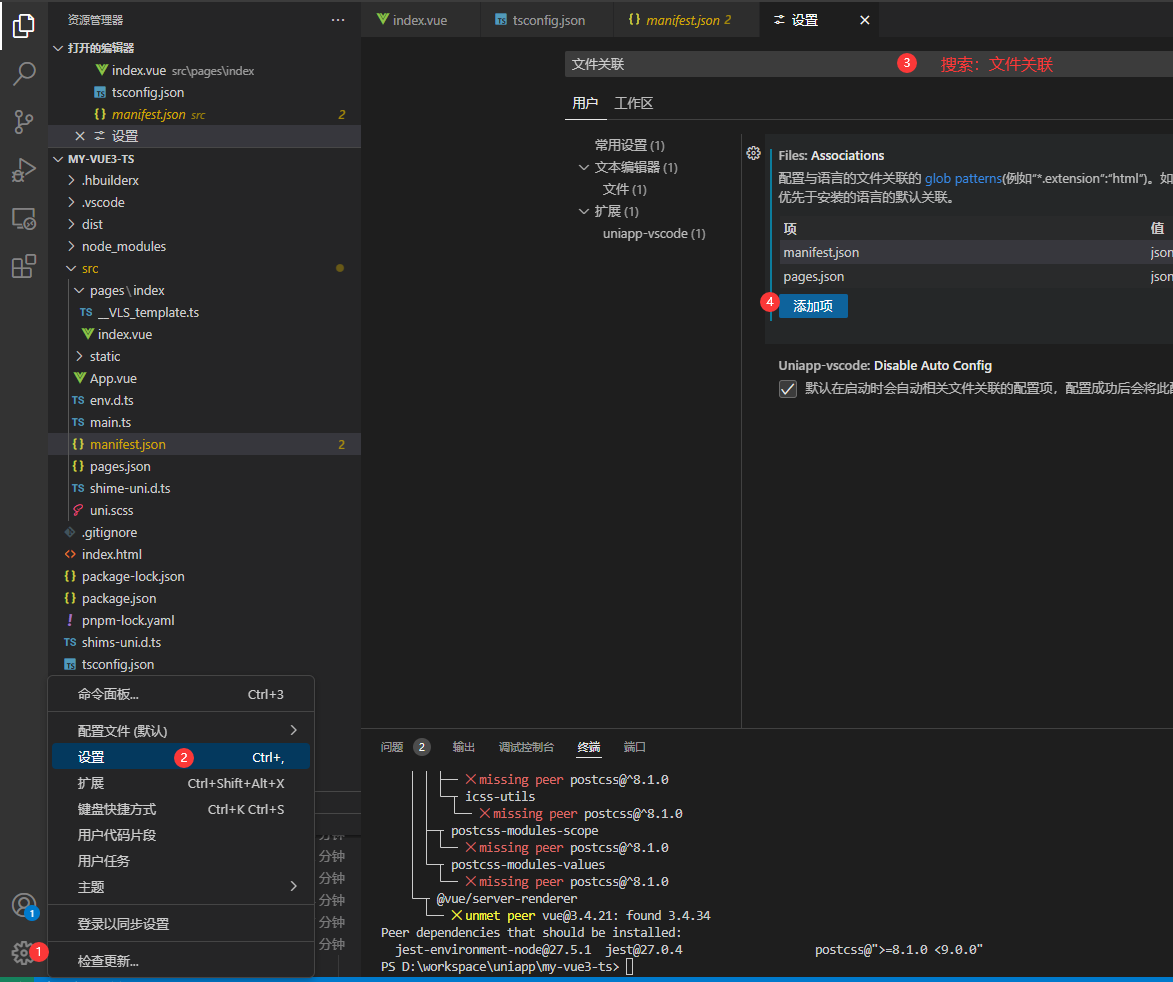
👉 JSON 注释问题
- 设置文件关联,把
manifest.json和pages.json设置为jsonc
- 设置文件关联,把
通过设置settings.json 解决注释问题
// .vscode/settings.json
{
  // 在保存时格式化文件
  "editor.formatOnSave": true,
  // 文件格式化配置
  "[json]": {
    "editor.defaultFormatter": "esbenp.prettier-vscode"
  },
  // 配置语言的文件关联
  "files.associations": {
    "pages.json": "jsonc", // pages.json 可以写注释
    "manifest.json": "jsonc" // manifest.json 可以写注释
  }
}
也可以通过界面进行设置
版本升级
- 原依赖
@types/wechat-miniprogram现调整为 miniprogram-api-typings。 - 原配置
experimentalRuntimeMode现调整为nativeTags。
这一步处理很关键,否则 TS 项目无法校验组件属性类型。
开发工具回顾
选择自己习惯的编辑器开发 uni-app 项目即可。
HbuilderX 和 微信开发者工具 关系
VS Code 和 微信开发者工具 关系
基础
1. 路由&参数接收
路由跳转参数接收
- 使用标签
<navigator :url="`/pages/hot/hot?type=${item.type}`">
  …省略
</navigator>
- 使用js方法跳转
uni.navigateTo({ url: '/pages/login/login' })
跳转tabs页面
如果跳转的页面是底部tabBar,则需要使用
switchTab进行跳转
 // 页面跳转
uni.switchTab({ url: '/pages/my/my' })
接收参数
// uniapp 获取页面参数
const query = defineProps<{
  type: string
}>()
console.log(query)
2. 动态设置标题
uni.setNavigationBarTitle({ title: currHot!.title })
3. poprs
4. ref
5. 请求
import { http } from '@/utils/http'
import type { PageParams } from '@/types/global'

/**交叉类型 **/
type HotParams = PageParams & {
  /** Tab 项的 id,默认查询全部 Tab 项的第 1 页数据 */
  subType?: string
}
/**
 * 通用热门推荐类型
 * @param url 请求地址
 * @param data 请求参数
 */
export const getHotRecommendAPI = (url: string, data?: HotParams) => { // 其中data可以不填,所以加上 ?(支持它不填写)
  return http<HotResult>({
    method: 'GET',
    url,
    data,
  })
}
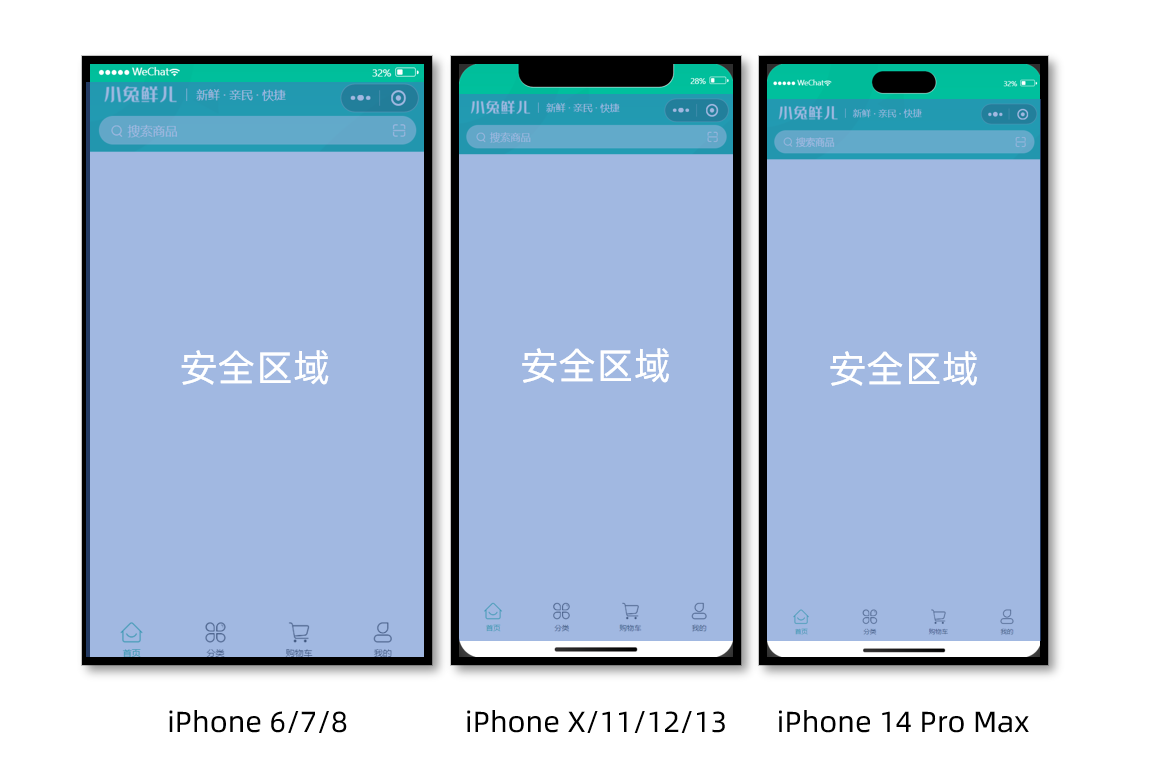
6. 安全区
const { safeAreaInsets } = uni.getSystemInfoSync()
- 头部导航栏控制
<template>
  <!-- 顶部占位 -->
  <view class="navbar" :style="{ paddingTop: safeAreaInsets?.top + 'px' }">
    <!-- ...省略 -->
  </view>
</template>
底部安全区域控制

image-20240805142114756
  <view class="toolbar" :style="{ paddingBottom: safeAreaInsets?.bottom + 'px' }">
    <view class="icons">
      <button class="icons-button"><text class="icon-heart"></text>收藏</button>
      <button class="icons-button" open-type="contact">
        <text class="icon-handset"></text>客服
      </button>
      <navigator class="icons-button"><text class="icon-cart"></text>购物车</navigator>
    </view>
    <view class="buttons">
      <view class="addcart"> 加入购物车 </view>
      <view class="payment"> 立即购买 </view>
    </view>
  </view>
7. 父子交互
- 父调子
- 子调父
<script setup lang="ts">
// 子调父
const emit = defineEmits<{
  (event: 'close'): void
}>()
</script>

<template>
  <view class="service-panel">
    <!-- 关闭按钮 -->
    <text class="close icon-close" @tap="emit('close')"></text>
    ...省略
  </view>
</template>
8. 组合式函数
场景说明: 猜你喜欢需要分页加载并且好几个页面都用到,所以讲其抽出作为一个公共的组件,同时
// src/composables/index.ts

import type { XtxGuessInstance } from '@/types/components'
import { ref } from 'vue'

/**
 * 猜你喜欢组合式函数
 */
export const useGuessList = () => {
  // 获取猜你喜欢组件实例
  const guessRef = ref<XtxGuessInstance>() // ref

  // 滚动触底事件
  const onScrolltolower = () => {
    guessRef.value?.getMore()
  }

  // 返回 ref 和事件处理函数
  return { guessRef, onScrolltolower }
}
9. 分包
| 属性 | 类型 | 必填 | 描述 | 平台兼容 |
|---|---|---|---|---|
| subPackages | Object Array | 否 | 分包加载配置 | H5 不支 |
| preloadRule | Object | 否 | 分包预下载规则(配置preloadRule后,在进入小程序某个页面时,由框架自动预下载可能需要的分包,提升进入后续分包页面时的启动速度) | 微信小程序 |
src/pagesMember/settings/settings.vue
// src/pages.json

{
  // ...省略
  // 分包加载规则
  "subPackages": [
    {
      // 子包的根目录
      "root": "pagesMember",
      // 页面路径和窗口表现
      "pages": [
        {
          "path": "settings/settings",
          "style": {
            "navigationBarTitleText": "设置"
          }
        }
      ]
    }
  ],
  // 分包预下载规则 (当前页面进入"pages/my/my" 页面后 ,不管什么网络都加载pagesMember 模块)
  "preloadRule": {
    "pages/my/my": {
      "network": "all", // [!code ++]
      "packages": ["pagesMember"] // [!code ++]
    }
  }
}
注: WebStorm支持创建分包页面,但是需要先再pages.json页面中添加一个 subPackages和指定root
10. 图片上传
- 通过
uni.chooseMedia()读取用户相册的照片或者拍照。 - 通过
uni.uploadFile()上传用户图片。
// 修改头像
const onAvatarChange = () => {
  // 调用拍照/选择图片
  // 选择图片条件编译
  // #ifdef H5 || APP-PLUS
  // 微信小程序从基础库 2.21.0 开始, wx.chooseImage 停止维护,请使用 uni.chooseMedia 代替
  uni.chooseImage({
    count: 1,
    success: (res) => {
      // 文件路径
      const tempFilePaths = res.tempFilePaths
      // 上传
      uploadFile(tempFilePaths[0])
    },
  })
  // #endif

  // #ifdef MP-WEIXIN
  // uni.chooseMedia 仅支持微信小程序端
  uni.chooseMedia({
    // 文件个数
    count: 1,
    // 文件类型
    mediaType: ['image'],
    success: (res) => {
      // 本地路径
      const { tempFilePath } = res.tempFiles[0]
      // 上传
      uploadFile(tempFilePath)
    },
  })
  // #endif
}

// 文件上传-兼容小程序端、H5端、App端
const uploadFile = (file: string) => {
  // 文件上传
  uni.uploadFile({
    url: '/member/profile/avatar',
    name: 'file',
    filePath: file,
    success: (res) => {
      if (res.statusCode === 200) {
        const avatar = JSON.parse(res.data).result.avatar
        // 个人信息页数据更新
        profile.value.avatar = avatar
        // Store头像更新
        memberStore.profile!.avatar = avatar
        uni.showToast({ icon: 'success', title: '更新成功' })
      } else {
        uni.showToast({ icon: 'error', title: '出现错误' })
      }
    },
  })
}
11. 地区选择器
<script setup lang="ts">
// 修改城市
let fullLocationCode: [string, string, string] = ['', '', '']
const onFullLocationChange: UniHelper.RegionPickerOnChange = (ev) => { // 主要是记录  : UniHelper.RegionPickerOnChange
  // 修改前端界面
  profile.value.fullLocation = ev.detail.value.join(' ')
  // 提交后端更新
  fullLocationCode = ev.detail.code!
}
</script>
<template>
    <picker class="picker" mode="region" :value="profile?.fullLocation?.split(' ')" @change="onFullLocationChange" >
            <view v-if="profile?.fullLocation">{{ profile?.fullLocation }}</view>
            <view class="placeholder" v-else>请选择城市</view>
          </picker>
</team>
12. 日期选择器
<script setup lang="ts">
    const onBirthdayChange: UniHelper.DatePickerOnChange = (ev) => { // 主要是记录  : UniHelper.DatePickerOnChange
        profile.value.birthday = ev.detail.value
    }
</script>
<template>
    <picker class="picker" mode="date"  :value="profile?.birthday"
            start="1900-01-01" :end="new Date()" @change="onBirthdayChange" >
            <view v-if="profile?.birthday">{{ profile?.birthday }}</view>
            <view class="placeholder" v-else>请选择日期</view>
          </picker>
</team>
13. 单选
<script setup lang="ts">
    // 修改性别
const onGenderChange: UniHelper.RadioGroupOnChange = (ev) => {
  profile.value.gender = ev.detail.value as Gender
}
</script>
<template>
   <radio-group @change="onGenderChange">
            <label class="radio">
              <radio value="男" color="#27ba9b" :checked="profile?.gender === '男'" />
              男
            </label>
            <label class="radio">
              <radio value="女" color="#27ba9b" :checked="profile?.gender === '女'" />
              女
            </label>
          </radio-group>
</team>
注意
picker城市选择器,H5端不支持
<view class="form-item">
          <text class="label">城市</text>
          <picker
            class="picker"
            mode="region"
            :value="profile?.fullLocation?.split(' ')"
            @change="onFullLocationChange"
          >
            <view v-if="profile?.fullLocation">{{ profile?.fullLocation }}</view>
            <view class="placeholder" v-else>请选择城市</view>
          </picker>
        </view>