
uniapp
uniapp
uniapp 设置不同环境变量 https://blog.csdn.net/O_O_______/article/details/125843939
下拉刷新:https://www.cnblogs.com/ckfeng/p/16201280.html#!comments
https://blog.csdn.net/qq_43531694/article/details/121439951
1. 开发准备
- HbuildX
- 微信开发者工具
2. 使用
点击 运行 --> 运行到小程序模拟器 --> 微信开发着工具
需要添加开发者权限 https://mp.weixin.qq.com/
3. 分包的概念
参考: https://www.cnblogs.com/moranjl/p/17075940.html
https://www.jianshu.com/p/b5247da27d65
https://www.ngui.cc/article/show-888473.html?action=onClick
项目创建时需要 有分包的意识
- 主包不可以引用子包中的任何东西(包含组件、组件等, 跳转路由可以)
- 子包可以引用主包的全部东西(包含组件、组件等)
- 子包和子包之间的任何东西都不可互相引用(包含组件、组件等)
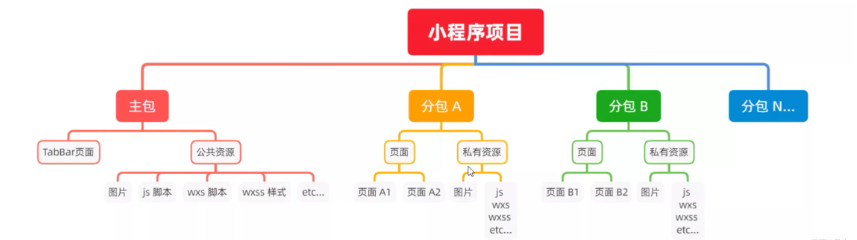
1、什么是分包
分包指的是把一个完整的小程序项目,按照需求划分为不同的子包,在构建时打包成不同的分包,用户在使用时按需进行加载。
分包原理:在小程序启动时,默认会下载主包并启动主包内页面,当用户进入分包内某个页面时,客户端会把对应分包下载下来,下载完成后再进行展示。
2、分包后的项目构成
分包后小程序由一个主包与多个分包组成,
主包:一般只包含项目的启动页面或 TabBar 页面、以及所有分包都需要用到的一些公共资源 分包:只包含和当前分包有关的页面和私有资源
3. 为什么需要进行分包
对小程序进行分包,可以优化小程序首次启动的下载时间,以及在多团队共同开发时可以更好的解耦协作
目前小程序分包大小有以下限制:
- 整个小程序所有分包大小不超过 20M(微信小程序版本不同,大小不同)
- 单个分包/主包大小不能超过 2M
├── app.js
├── app.json
├── app.wxss
├── packageA   -- 分包A
│   └── pages
│       ├── cat
│       └── dog
├── packageB   -- 分包B
│   └── pages
│       ├── apple
│       └── banana
├── pages       --- 这个是主包
│   ├── index
│   └── logs
└── utils
4. 具体实现
manifest.json 文件下
    "mp-weixin" : {
        /* 需要开启分包*/
        "optimization" : {
            "subPackages" : true
        }
    }
pages.json 文件
将 pages 里面的页面配置 迁移到 分包中,主要路径
"pages": [{},{}],
"subPackages": [
    {
        "root": "packageA",
        "pages": [
            {
                "path": "pages/cat",
                "style": {}
            },
            {
                "path": "pages/dog",
                "style": {}
            },
        ]
    },
    {
        "root": "packageB",
        "pages": [
            {
                "path": "pages/apple",
                "style": {}
            },
            {
                "path": "pages/banana",
                "style": {}
            },
        ]
    }
]
学习
内置组件查看
https://hellouniapp.dcloud.net.cn/pages/component/navigator/navigator
1. 新建页面
uni-app中的页面,通常会保存在工程根目录下的pages目录下。
每次新建页面,均需在pages.json中配置pages列表;
2. 应用首页
uni-app会将pages.json -> pages配置项中的第一个页面,作为当前工程的首页(启动页)。
3. 路由配置
{
    "path": "pages/home/index",
    "style": {
        "navigationBarTextStyle": "white", // 导航栏标题颜色,只能设置 white/black
        "navigationStyle": "custom", // 取消原生导航栏后,由于窗体为沉浸式,占据了状态栏位置。此时可以使用一个高度为 var(--status-bar-height) 的 view 放在页面顶部,避免页面内容出现在状态栏。
        "navigationBarTitleText": "钢铁招采平台1", // 导航栏标题内容 如果"navigationStyle": "custom" 则当前设置不会显示
        "navigationBarBackgroundColor": "#564F47"
    }
}
背景图片
超过
40kb不用背景图
uni-app 支持使用在 css 里设置背景图片,使用方式与普通 web 项目大体相同,但需要注意以下几点:
支持 base64 格式图片。
支持网络路径图片。
小程序不支持在 css 中使用本地文件,包括本地的背景图和字体文件。需以 base64 方式方可使用。
使用本地路径背景图片需注意:
- 为方便开发者,在背景图片小于 40kb 时,
uni-app编译到不支持本地背景图的平台时,会自动将其转化为 base64 格式; - 图片大于等于 40kb,会有性能问题,不建议使用太大的背景图,如开发者必须使用,则需自己将其转换为 base64 格式使用,或将其挪到服务器上,从网络地址引用。
- 本地背景图片的引用路径推荐使用以 ~@ 开头的绝对路径。
.test2 {
	background-image: url('~@/static/logo.png');
}
复制代码
- 为方便开发者,在背景图片小于 40kb 时,
注意
- 微信小程序不支持相对路径(真机不支持,开发工具支持)
3.开发记录
1. 导航栏高度计算
去掉原生的原生的 状态导航栏,下面的两种方式,选择其中一个就行
采用 自定义导航栏,是因为原始导航栏中标题位置无法自定义,默认都是居中
"navigationStyle":"custom"
// 或者
"app-plus":{
		"titleNView":false
	}
手动计算自定义导航栏高度
参考: https://blog.csdn.net/qq_35430000/article/details/123632090
https://blog.csdn.net/qq_41231694/article/details/103894927
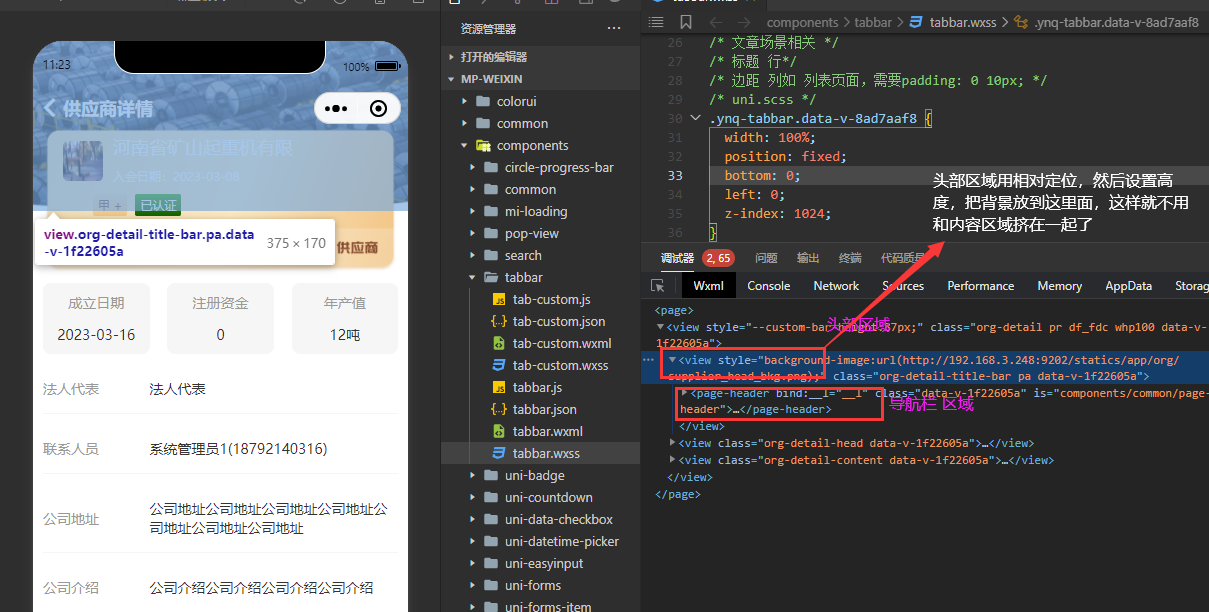
开发设计
针对 头部区域设置背景图片或者 颜色的场景,可以将 讲标题行 用元素包裹着,然后相对定位,脱离文档流,这样 头部区域和内容区域就分开了
目前不确定 是否有必要 存储在 store 里面
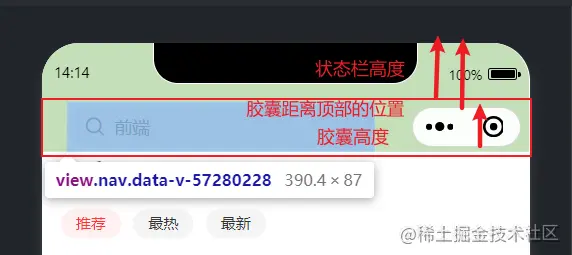
导航栏 分为 :状态栏 + 标题栏(包含 右上角胶囊按钮)
uniapp获取手机状态栏和头部导航栏高度
statusBar ---------- 状态栏高度 customBar -------- 状态栏高度 + 导航栏高度
建议在公共位置使用该段代码,以达到可以全局复用的效果。 这里我们存在store中,存在store中有个好处,就是能够实时变化。 避免uni.getSystemInfo()执行未完成时就渲染高度,而在uni.getSystemInfo()完成后无法实时变换高度。
这里又存在一个问题,直接使用this.$store.state.statusBar设置在布局标签上有时会不生效。 解决方法: 重新赋值给该页面自定义的变量,然后设置到布局标签上则能够成功。
定义在 App.vue 里面
<script>
    import Vue from 'vue'

    export default {

        onLaunch: function () {
            uni.hideTabBar()
            uni.getSystemInfo({
                success: function (e) {
                    // 这里 将 获取 导航栏 信息 导航栏高度(CustomBar) 、状态栏高度(StatusBar)、标题行高度(titleBarHeight - 自定义的 右上角胶囊按钮 所在区域高度)
                    let statusBar;// 获取的是手机状态栏的高度。
                    let customBar;
                    // #ifndef MP
                    statusBar = e.statusBarHeight
                    if (e.platform == 'android') { //客户端平台,值域为:ios、android
                        customBar = e.statusBarHeight + 50
                    } else {
                        customBar = e.statusBarHeight + 45
                    }
                    // #endif
                    // #ifdef MP-WEIXIN
                    statusBar = e.statusBarHeight
                    let custom = wx.getMenuButtonBoundingClientRect() //右上角胶囊按钮的显示区域,以屏幕左上角为原点。
                    Vue.prototype.Custom = custom;
                    customBar = custom.bottom + (custom.top - e.statusBarHeight) // 导航栏高度(标题栏高度) = 状态栏高度+ 标题栏(包含 右上角胶囊按钮)
                    console.log('MP-WEIXIN')
                    // #endif
                    // #ifdef MP-ALIPAY
                    statusBar = e.statusBarHeight
                    customBar = e.statusBarHeight + e.titleBarHeight
                    console.log('MP-ALIPAY')
                    // #endif
                    // 自定义 标题行高度(右上角胶囊按钮 所在区域)
                    Vue.prototype.StatusBar = statusBar;
                    Vue.prototype.CustomBar = customBar;
                    const TitleBarHeight = customBar - statusBar;
                    Vue.prototype.TitleBarHeight = TitleBarHeight;
                    console.log('导航栏高度计算:'+statusBar,TitleBarHeight,customBar)
                    // 缓存到 store 里面
                    // this.$store.commit('SET_STATUS_BAR', statusBar); // 状态栏
                    // this.$store.commit('SET_TITLE_BAR', titleBarHeight)// 标题栏
                    // this.$store.commit('SET_CUSTOM_BAR', customBar) // 导航栏(总)
                },
                fail: function (e) {
                    this.$refs.loading.hide()
                    console.log('fail')
                }
            })
            console.log('App Launch')
        },
        onShow: function () {
            uni.hideTabBar()
            console.log('App Show')
        },
        onHide: function () {
            console.log('App Hide')
        },
        globalData: {
            index: 0,
        }
    }
</script>
- 参考,使用 mixin.js
<script>
export default {
  globalData: {
    statusBarHeight: 0, // 状态导航栏高度
    navHeight: 0, // 总体高度
    navigationBarHeight: 0, // 导航栏高度(标题栏高度)
  },
  onLaunch: function () {
    console.log("App Launch")

    // 状态栏高度
    this.globalData.statusBarHeight = uni.getSystemInfoSync().statusBarHeight

    // #ifdef MP-WEIXIN
    // 获取微信胶囊的位置信息 width,height,top,right,left,bottom
    const custom = wx.getMenuButtonBoundingClientRect()
    // console.log(custom)

    // 导航栏高度(标题栏高度) = 胶囊高度 + (顶部距离 - 状态栏高度) * 2
    this.globalData.navigationBarHeight = custom.height + (custom.top - this.globalData.statusBarHeight) * 2
    // console.log("导航栏高度:"+this.globalData.navigationBarHeight)

    // 总体高度 = 状态栏高度 + 导航栏高度
    this.globalData.navHeight = this.globalData.navigationBarHeight + this.globalData.statusBarHeight

    // #endif

    console.log(this.globalData)
  },
  onShow: function () {
    console.log("App Show")
  },
  onHide: function () {
    console.log("App Hide")
  },
}
</script>
2. 如何在css样式种使用data中的变量
参考: https://blog.csdn.net/zz00008888/article/details/126222530
https://blog.csdn.net/HXH_csdn/article/details/113864516
[vue 中使用](../vue/Vue.md#5. vue2如何在css样式种使用data中的变量)
小程序上 在动态绑定
style样式时渲染到标签中的是[object Object],原因是因为:小程序不支持动态绑定对象格式的样式,可以 加上[]:style="[styleVar]"
<template>
  <div class="box" :style="[styleVar]"> <!-- 说明:这里不能少 类似js的作用域 否则 下面的style 中无法使用 -->
      <div class='son'> </div>
  </div>
</template>
<script>
export default {
    props: {
        height: {
            type: Number,
            default: 94,
        },
        whith: {
            type: Number,
            default: 200,
        },
    },
    computed: {
        styleVar() {
            return {
                '--box-width': this.whith + 'px',
                '--box-height': this.height + 'px'
            }
        }
    },
}
</script>
<style lang="scss"  scoped>
.son {
  height: var(--box-height); /* 这里调用 --box-height  要和上面 定义的变量 保存一致*/
  width: var(--box-width);
  background: red;
}
</style>
背景图片
style 无法使用本地路径图片
<template>
    <view class="index" :style="{backgroundImage:`url(${indexBackgroundImage})`,backgroundSize: 'cover'}">
        <!--你的内容-->
    </view>
</template>

<script>
    import indexBackgroundImage from "@/static/img/account_index.jpg"
    export default {
        data() {
            return {
                indexBackgroundImage:indexBackgroundImage
            }
        },
        methods: {
        }
    }
</script>
<style lang="scss" scoped="">
</style>
http://www.hcoder.net/course/info_246.html
使用异常记录
1. 运行到手机调试,如果提示文件过大
2.图片的使用
2.1 背景图的使用
<view class="home-content-head pr" :style="{backgroundImage:`url(${headBackgroundImage})`}">

import headBackgroundImage from '../../static/bigImgs/head_back.png' // 头部背景

export default {
        data () {
            return {
                headBackgroundImage: headBackgroundImage
            }
        },
}


    .home-content-head {
        /* background: url(../../static/imgs/head_back.png) no-repeat center;*/
        background-size: 100% 100%;
        width: 100%;
        height: 610px;
    }
2.2 image加载失败显示默认图片
需要注意 @error 本质是对 原来 赋值src 的属性值修改,所以 如果 对象是props 传过来的对象,则修改src 会失效
<image v-for="(item, index) in srcBox" :src="item" @error="error(index)"></image>
error(index) {
	console.log(this.srcBox);
	console.log(index)
	this.$set(this.srcBox, index, this.src);
}
uni-app 实现下拉刷新功能
1、需要在pages.json 里,找到的当前页面的pages节点,并在 style 选项中开启enablePullDownRefresh。 2、当处理完数据刷新后,uni.stopPullDownRefresh()可以停止当前页面的下拉刷新
- pages.json
{
    "pages": [
        {
            "path": "pages/index/index",
            "style": {
                "navigationBarTitleText": "uni-app",
                "enablePullDownRefresh": true
            }
        }
    ],
    "globalStyle": {
        "navigationBarTextStyle": "white",
        "navigationBarBackgroundColor": "#0faeff",
        "backgroundColor": "#fbf9fe"
     }
}
// 仅做示例,实际开发中延时根据需求来使用。
export default {
    data: {
        text: 'uni-app'
    },
    onShow: function (options) {
      this.loadData();
    },
    onPullDownRefresh() {
      this.loadData()
    }
   methods:{
       loadData() {
                this.$http('/data', {}, 'get').then((res) => {
                    //数据请求完成之后停止下拉刷新
                    uni.stopPullDownRefresh();
                    if (res.status) {
                        this.activityList = res.data
                    }
                })
            }
      }
}
自定义下拉刷新
scroll-view 下面的子节点不能 设置
overflow: auto;否则 会出现下拉刷新和下拉滚动冲突
<view class="home home-view pr">
    <page-header title="钢协招采平台" titlePposition='left-down'/>
    <scroll-view scroll-y
                 :refresher-threshold="100"
                 :refresher-enabled="true"
                 :refresher-triggered="refresherTriggered"
                 @refresherrefresh="refresherrefresh"
                 @refresherrestore="refresherrestore"
                 @refresherabort="refresherabort" class="home-content-scroll"
                 >
        <view class="home-content bs pr" style='height:900px;'>
            滚动内容区域
        </view>
    </scroll-view>
</view>


<script>

    export default {
        data () {
            return {
              refresherTriggered: false, //下拉刷新状态
                _refresherTriggered: false //防止异步操作
            }
        },
        created () {
            this.loadData()
        },

        mounted () {
        },
        methods: {
            refresherrefresh () {
                console.log('自定义下拉刷新被触发')
                let _this = this
                if (_this._refresherTriggered) {
                    return
                }
                _this._refresherTriggered = true
                //界面下拉触发,triggered可能不是true,要设为true
                if (!_this.refresherTriggered) {
                    _this.refresherTriggered = true
                }
                this.loadStoreData()
            },
            refresherrestore () {
                console.log('自定义下拉刷新被复位')
                let _this = this
                _this.refresherTriggered = false
                _this._refresherTriggered = false
            },
            refresherabort () {
                console.log('自定义下拉刷新被中止    ')
                let _this = this
                _this.refresherTriggered = false
                _this._refresherTriggered = false
            },
            loadStoreData () {
                let _this = this
                this.loadData()
                setTimeout(() => {
                    _this.refresherTriggered = false //触发onRestore,并关闭刷新图标
                    _this._refresherTriggered = false
                }, 800)
            },
            // 业务数据加载
            loadData () {
                console.log('loadData')
                this.getHintMes() // 获取提示语
            },
            // 获取提示语,默认取平台配置项,没用使用 当前年份
            async getHintMes () {
                const res = await this.axiosApiFormdata('/system/config/configKey/zcpt.year', {}, 'GET').catch((e) => {
                    return // 直接跑出,调用下面的 else 方法 加载年份
                })
                if (res && res.code === 200 && res.msg) {
                    this.hintMes = res.msg
                } else {
                    this.getFullYear()
                }
            }
        }
    }
</script>

<style lang="scss">
    /*新首页*/
    .home-view {
        height: 100%;
        width: 100%;
        background: #171721;
        overflow: hidden;
    }

    .home-content-scroll {
        width: 100%;
        height: calc(100% - var(--custom-bar-height));
        overflow: hidden;
    }

    /*内容区域*/
    .home-content {
       /*overflow: auto;*/
    }

</style>
uniapp 自定义组件会多一级父级节点 设置css 属性不生效
使用 **/deep/ ** 并且定义 的class 也是子组件的class
<page-header title="钢协招采平台" titlePposition='left-center' class="page-header"/>
/deep/.page-header{
	background-color: #5F6073;
}
同时需要 在父组件上和methods平级 加上这句话: options: { styleIsolation: ‘shared’ },//解决/deep/不生效
options: {
	styleIsolation: 'shared',
},
取消 父组件 引入子组件 多添加一个虚拟的 父节点
于data 同级
// 取消 父组件 引用 子组件 添加一个虚拟的 父节点
options: {
	virtualHost: true,  //  将自定义节点设置成虚拟的,更加接近Vue组件的表现
},
options: {
            multipleSlots: true, // 在组件定义时的选项中启用多slot支持
            styleIsolation: 'shared', // 解决/deep/不生效
            virtualHost: true,//  将自定义节点设置成虚拟的,更加接近Vue组件的表现
        },
uniapp实现tabs切换(可滑动)
https://huaweicloud.csdn.net/639fe8e3dacf622b8df8f8f7.html
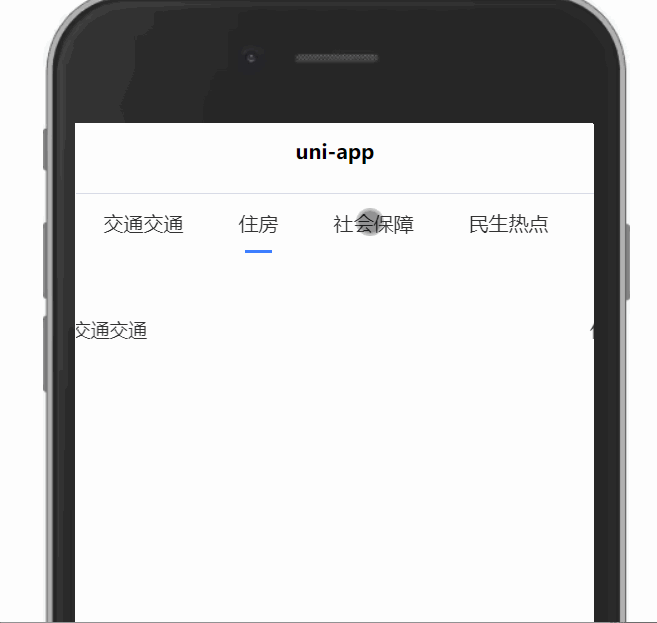
<template>
	<view class="body-view">
		<!-- 使用scroll-view实现tabs滑动切换 -->
		<scroll-view class="top-menu-view" scroll-x="true" :scroll-into-view="tabCurrent">
			<view class="menu-topic-view" v-for="item in tabs" :id="'tabNum'+item.id" :key="(item.id - 1)" @click="swichMenu(item.id - 1)">
				<view :class="currentTab==(item.id - 1) ? 'menu-topic-act' : 'menu-topic'">
					<text class="menu-topic-text">{{item.name}}</text>
					<view class="menu-topic-bottom">
						<view class="menu-topic-bottom-color"></view>
					</view>
				</view>
			</view>
		</scroll-view>
		<!-- 内容 -->
		<swiper class="swiper-box-list" :current="currentTab" @change="swiperChange">
			<swiper-item class="swiper-topic-list" v-for="item in swiperDateList" :key="item.id">
				<view class="swiper-item">
					{{item.content}}
				</view>
			</swiper-item>
		</swiper>
	</view>
</template>

<script>
	export default {
		data() {
			return {
				tabs: [{
						id: 1,
						name: '推荐'
					},
					{
						id: 2,
						name: '交通交通'
					},
					{
						id: 3,
						name: '住房'
					},
					{
						id: 4,
						name: '社会保障'
					},
					{
						id: 5,
						name: '民生热点'
					},
					{
						id: 6,
						name: '即日头条'
					},
					{
						id: 7,
						name: '新闻联播'
					},
				],
				currentTab: 0,
				tabCurrent: 'tabNum1',
				// Tab切换内容
				swiperDateList: [{
						id: 1,
						content: '推荐'
					},
					{
						id: 2,
						content: '交通交通'
					},
					{
						id: 3,
						content: '住房'
					},
					{
						id: 4,
						content: '社会保障'
					},
					{
						id: 5,
						content: '民生热点'
					},
					{
						id: 6,
						content: '即日头条'
					},
					{
						id: 7,
						content: '新闻联播'
					},
				],
			}
		},
		onLoad() {

		},
		methods: {
			swichMenu(id) {
				this.currentTab = id
				console.log(11,id)
				this.tabCurrent = 'tabNum'+ id
			},
			swiperChange(e) {
				console.log(22,e.detail.current)
				let index = e.detail.current
				this.swichMenu(index)
			}
		}
	}
</script>

<style scoped lang="scss">
	.body-view {
		height: 100vh;
		width: 100%;
		display: flex;
		flex: 1;
		flex-direction: column;
		overflow: hidden;
		align-items: flex-start;
		justify-content: center;
	}

	.top-menu-view {
		display: flex;
		position: fixed;
		top: 100rpx;
		left: 0;
		white-space: nowrap;
		width: 100%;
		background-color: #FFFFFF;
		height: 86rpx;
		line-height: 86rpx;
		border-top: 1rpx solid #d8dbe6;

		.menu-topic-view {
			display: inline-block;
			white-space: nowrap;
			height: 86rpx;
			position: relative;

			.menu-topic-text {
				font-size: 30rpx;
				color: #303133;
				padding: 10rpx 40rpx;
			}

			// .menu-topic-act {
			// 	margin-left: 30upx;
			// 	margin-right: 10upx;
			// 	position: relative;
			// 	height: 100%;
			// 	display: flex;
			// 	align-items: center;
			// 	justify-content: center;
			// }

			.menu-topic-bottom {
				position: absolute;
				bottom: 0;
				width: 100%;

				.menu-topic-bottom-color {
					width: 40rpx;
					height: 4rpx;
				}
			}

			.menu-topic-act .menu-topic-bottom {
				display: flex;
				justify-content: center;
			}

			.menu-topic-act .menu-topic-bottom-color {
				background: #3d7eff;
			}


		}


	}

	.swiper-box-list {
		width: 100%;
		padding-top: 200rpx;
		flex:1;
		background-color: #FFFFFF;
		.swiper-topic-list {
		     width: 100%;
		 }
	}
</style>
uni-app 列表消息滚动的实现
参考:https://blog.csdn.net/weixin_44285250/article/details/108601690
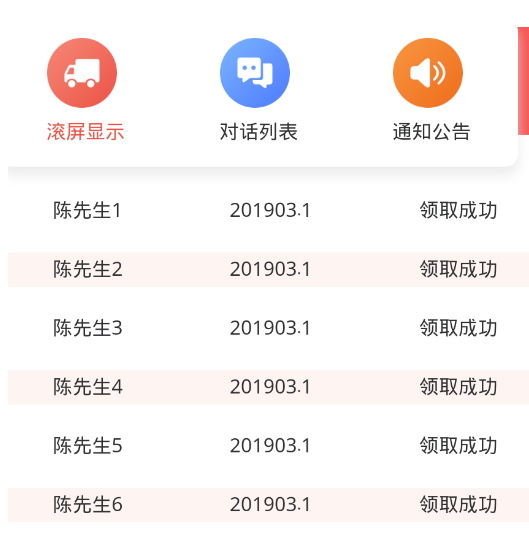
<template>
	<view class="home">
		<view class="list uni-flex uni-column">
			<view class="wrap-item">
				<view class="lis uni-flex uni-column" :animation="animationData">
					<view class="uni-flex uni-column" v-for="(item, index) in list" :key="index">
						<view class="swiper-item item_title uni-flex list_item">
							<view class="userlistmsg" :class="index%2?'cor':'non'">
								<view>{{ item.time }}</view>
								<view>{{ item.phone }}</view>
								<view>{{ item.prize }}</view>
							</view>
						</view>
					</view>
				</view>
			</view>
		</view>
	</view>
</template>

<script>
export default {
		data() {
			return {
				list: [{
						time: '陈先生1',
						phone: '201903.1',
						prize: '领取成功'
					},
					{
						time: '陈先生2',
						phone: '201903.1',
						prize: '领取成功'
					},
					{
						time: '陈先生3',
						phone: '201903.1',
						prize: '领取成功'
					},
					{
						time: '陈先生4',
						phone: '201903.1',
						prize: '领取成功'
					},
					{
						time: '陈先生5',
						phone: '201903.1',
						prize: '领取成功'
					},
					{
						time: '陈先生6',
						phone: '201903.1',
						prize: '领取成功'
					}
				],
				scrollHeight: 0, //向上滚动距离
				height: 0, //.lis高度(滚动框高度)
				animationData: {} ,//动画对象
			}
		},
	components: {},
	mounted() {
		console.log("11")
		this.prizeScroll();
	},
	methods: {
		getHeight(Class) {
			let query = uni.createSelectorQuery().in(this);
			query
				.selectAll(Class)
				.boundingClientRect(data => {
					this.height = data[0].height;
				})
				.exec();
		},
		prizeScroll() {
			let speed = 50;
			let animation = uni.createAnimation({
				duration: this.getHeight('.lis') / speed,
				timingFunction: 'linear',
				delay: 0
			});
			this.animation = animation;
			setInterval(() => {
				if (this.scrollHeight >= this.height) {
					animation.translateY(0).step();
					this.scrollHeight = 0;
					this.animationData = animation.export();
				} else {
					this.scrollHeight = this.scrollHeight + 1;
					animation.translateY(-this.scrollHeight).step();
					this.animationData = animation.export();
				}
			}, speed);
		}
	}
};
</script>

<style>
	page{
		width: 100%;
	}
	.home,.list {
		width: 750upx;
		padding-top: 30upx;
	}
	.userlistmsg{
		width: 100%;
		display: flex;
		justify-content: space-around;
	}
	.cor{
		background: #FFF5F3 ;
	}
</style>
uniapp文字上下滚动

<!--消息公告-->
<template>
    <view class="mes-gg" v-if="messList && messList.length>0">
        <view class="mes-gg-wrap whp100 df">
            <view class="mes-gg-left df_center">
                <text>{{textLineFeed('消息公告')}}</text>
            </view>
            <view class="mes-gg-right df_acc_jcs long_omit">
                <view class="mes-gg-roll long_omit whp100" >
                    <view class="mes-gg--ul long_omit" :style="{height: messListHeight+'px'}" :animation="animationData">
                        <view class="mes-gg--ul__li" v-for="item in messList" @click="showDetail(item.id)" v-html="item.content"></view>
                        <!-- <view class="mes-gg--ul__li" v-for="item in messList" @click="showDetail(item.id)">{{item.theme}}</view> -->
                    </view>
                </view>
                <!-- 更多按钮-->
                <uni-icons type="forward" size="20" class="more" @click="showMore"></uni-icons>
            </view>
        </view>
    </view>
</template>

<script>
    import {textLineFeed} from '../../../../common/utils/common.js'
    export default {
        components: {  },
        data () {
            return {
                messList:[],// 最新3条消息
                scrollHeight: 0, //向上滚动距离
                liHeight:41, // 每条 内容所占 高度
                messListHeight:0,// 内容总高度
                animationData: {} ,//动画对象
            }
        },
        // 取消 父组件 引用 子组件 添加一个虚拟的 父节点
        options: {
            virtualHost: true,  //  将自定义节点设置成虚拟的,更加接近Vue组件的表现。我们不希望自定义组件的这个节点本身可以设置样式、响应 flex 布局等,而是希望自定义组件内部的第一层节点能够响应 flex 布局或者样式由自定义组件本身完全决定
        },
        created () {

        },
        onLoad () {

        },
        mounted() {
            this.loadData()
        },
        methods: {
            async loadData () {
                const params = {
                    pageNum: 1,
                    pageSize: 3
                }
                const res = await this.axiosApiFormdata('/operation/notice/list', params, 'GET')
                if (res && res.code === 200 && res.rows) {
                    this.messList = res.rows;
                    this.getMessListHeight();// 计算出容器实际高度
                    this.messScroll();
                } else {
                    this.messList = [];
                }
            },
            getMessListHeight () {
                this.messListHeight = this.messList.length*this.liHeight;
            },
            // 文字换行
            textLineFeed(value){
                return textLineFeed(value);
            },
            messScroll() {
                let speed = 2000;
                let animation = uni.createAnimation({
                    timingFunction: 'linear',
                    delay: 0
                });
                this.animation = animation;
                setInterval(() => {
                    this.scrollHeight = this.scrollHeight + this.liHeight;
                    if (this.scrollHeight >= this.messListHeight) {
                        animation.translateY(0).step();
                        this.scrollHeight = 0;
                        this.animationData = animation.export();
                    } else {
                        animation.translateY(-this.scrollHeight).step();
                        this.animationData = animation.export();
                    }
                }, speed);
            },
            /* 跳转详情*/
            showDetail(id){

            },
            /* 查看更多*/
            showMore(){

            },
        }
    }
</script>
<style lang="scss" scoped>
    /*消息公告*/
    .mes-gg{
        padding:0 $uni-padding-margin-size;
        &-wrap{
            height: 41px;
            background: #FFFFFF;
            border-radius: 8px 8px 8px 8px;
        }
        &-left{
            width: 41px;
            height: 100%;
            background: linear-gradient(310deg, #F6C58A 0%, #FFE8C2 45%, #EFD9B4 100%);
            border-radius: 8px 0px 0px 8px;
            flex-shrink:0;
        }
        &-right{
            flex: 1;
            padding: 0 10px;
            font-size: 14px;
            font-family: Source Han Sans CN-Regular, Source Han Sans CN;
            font-weight: 400;
            color: #666666;
            line-height: 14px;
            letter-spacing: 1px;
            .more{
                color: #CCCCCC;
                flex-shrink:0;
                margin-left: 5px;
            }
        }
        &--ul{
            &__li{
                height: 41px;/* 容器高度*/
                line-height: 41px;
            }
        }
    }
</style>
描点定位
需要指定 高度,否则无法滚动
<scroll-view style="height:600px;" class="top-menu-view" :scroll-y="true" :scroll-into-view="checkId">
    <view class="whp100">
        <view id="file" class="supplier-exhibition-item">
            xxx
        </view>
        <view id="cp" class="supplier-exhibition-item">
            ddddd
        </view>
        <!--典型案例 -->
        <view id="case" class="supplier-exhibition-item">
            xxx
        </view>
    </view>
</scroll-view>
查询元素高度
select: 取第一个
selectAll: 取全部
            initScrollView() {
                return new Promise((resolve, reject) => {
                    const query = uni.createSelectorQuery().in(this);
                    query.selectAll('.supplier-exhibition-item').boundingClientRect(res => {
                        console.log(res)
                        this.$nextTick(() => {
                            resolve();
                        });
                    }).exec();
                });
            },
- 组装数据
const query = uni.createSelectorQuery().in(this);
// 遍历每列 拿到每列高度
query.select('.supplier-exhibition-item').boundingClientRect(data => {
    heightArr.push({ column: i, height: data.height });
}).exec(() => {
    if (this.data.column <= heightArr.length) {
        resolve(this.getMin(heightArr, 'height'));
    }
});
循环定义click 会导致编译失败
原因是key 定义导致click失败
<view class="item" v-for="(item,index) in items" :key="item.id" @click="gotoOrder(item.id)">
下载文件并打开
            fileDownload(filePath){
                uni.showLoading({
                    title:"正在加载中..."
                })
                uni.downloadFile({
                    url: filePath,//下载地址接口返回
                    success: (data) => {
                        uni.hideLoading();
                        if (data.statusCode === 200) {
                            //文件保存到本地
                            uni.saveFile({
                                tempFilePath: data.tempFilePath, //临时路径
                                success: function(res) {
                                    //打开文档查看
                                    uni.openDocument({
                                        filePath: res.savedFilePath,
                                        success: function(res) {
                                            // console.log('打开文档成功');
                                        }
                                    });
                                }
                            });
                        }
                    },
                    fail: (err) => {
                        console.log(err);
                        uni.hideLoading();
                        uni.showToast({
                            icon: 'none',
                            mask: true,
                            title: '失败请重新下载',
                        });
                    },
                });
            },
uni-app 页面的传参和接参
注意:传递参数只能以 ?key=value&key=value 方式传递
接受参数只能用 onLoad() 钩子函数来接收
created 函数调用在onLoad 前面,所以有子组件的页面需要注意,通过props传参的参数在created 中可能还没拿到
 onLoad(query){
     console.log("接收参数",query);      // query 就是传递过来的参数
 }
输入框对数字的限定
/**
 * 针对 input 对数字格式化 -- 限定只能输入整数和指定格式的小数
 * 分为 小数/整数
 * @param value : 需要校验的数字
 * @param format:指定格式 小数或者整数  "8,4"|| "8"
 * @param field:需要跟新的自动
 * @param Obj:实体对象 例如表单对象--form
 */
export const formatInportData = (value,format,field,Obj) => {
    const formatArr = format.split(",");
    let regx2 = '';
    if (formatArr.length == 1) { // 说明当前校验的是整数
        // value = value.replace(/[^\d]/g,'');
        regx2=new RegExp(`^\\d{0,${formatArr[0]}}`);
    } else { // 小数
        regx2=new RegExp(`^\\d{0,${formatArr[0]}}(?:\\.\\d{0,${formatArr[1]}})?`);
        // value = value.toString().match(/^\d{0,8}(?:\.\d{0,4})?/);
    }
    value = value.toString().match(regx2);
    value = value[0];
    setTimeout(()=>{
        Obj[field] =  value;
    },50)
    // 如果 数据不刷新,使用 set方法,目前使用没遇到问题
    // Vue.set([Obj],field,value)// 不能直接使用 this.$set
}
附件上传
目前使用了 async 附件上传完成才进行赋值,能监听到数据是否全部上传完成的状态
后期如果有需要需要判断是否上传完成,可以用下面的思路
本来是想完成 双向绑定,但是没有实现
/**
             * 选择文件的回调,目前用来执行 上传文件到服务器的操作
             * 由于上传 会修改文件名称,所以由  tempFiles 中拿到 文件名称
             */
            async selectImage (e) {
                console.log('selectImage传')
                for (const { name, url, uuid } of e.tempFiles) {
                    console.log('开始上传'+name)
                    const file = await  this.uploadFile(name, url, uuid)
                    this.fileList.push(file);
                    console.log('上传完成'+name)
                }
                console.log('结束')
                // this.$emit('update:modelValue', this.fileList) //没有实现
            },
            // 附件上传
            uploadFile (name, localUrl, uuid) {
                return new Promise((resolve, reject) => {
                    const this_ = this
                    uni.uploadFile({
                        url: this_.$base_url + '/file/upload?fileName=' + name,
                        filePath: localUrl,
                        header: {
                            'Authorization': 'Bearer ' + uni.getStorageSync('token'),
                            'Content-type': 'multipart/form-data'
                        },
                        name: 'file',
                        formData: { 'moduleName': this_.moduleName },
                        success: ({ data: uploadFiledata }) => {
                            const res = JSON.parse(uploadFiledata)
                            let fileItem = {}
                            if (res && res.code === 200 && res.data) {
                                fileItem = {
                                    url: res.data.url,
                                    path: res.data.path,
                                    uuid: uuid,
                                    name: name
                                }
                                console.log('返回'+name)
                                resolve(fileItem);
                                // this_.fileList.push(fileItem);
                            }
                        }
                    })
                });
            },
附件上传修改
urlPathField="filePath" 指定实体对象中存储 url全路径的字段
<uni-forms-item label="封面图片">
    <upload-file-custom v-model="frontPicList" ref="frontPicUploadRef" :moduleName="moduleName" limit="1" :disabled="disabled"
                        urlPathField="filePath" @selectFile="selectFile" key="frontPic"/>
</uni-forms-item>

<uni-forms-item label="产品图片">
    <upload-file-custom v-model="otherPicList" ref="otherPicsUploadRef" type="2" :moduleName="moduleName" :disabled="disabled"
                        urlPathField="filePath"  key="otherPics" @selectFile="selectFile"/>
</uni-forms-item>
initFile(){
    const fileList = [{ fileName: '', filePath: this.form.frontPic }]// 封面图
    this.initfrontPic('frontPicUploadRef', fileList)
    this.initfrontPic('otherPicsUploadRef', this.form.fileList)
},
// 选择文件后的回调
selectFile (item) {
    if (item.type === 1) { // 封面图片
        const files = item.data
        if (files && files.length > 0) {
            this.form.frontPic = files[0].url
        }
    } else {
        const files = item.data || []
        this.form.fileList = files
    }
},
组件 z-paging
@query :下拉刷新或滚动到底部时会自动触发此方法。
z-paging加载时也会触发(若要禁止,请设置:auto="false")。pageNo和pageSize会自动计算好,直接传给服务器即可@reload: 重置时调用
<template>
    <view class="whp100">
        <z-paging :fixed="false" ref="paging" v-model="dataList" @query="queryList" :auto="false">
            <product-page-list-item ref="waterfallsFlowRef" :value="dataList" key="page" />
        </z-paging>
    </view>
</template>
<script>
    import ProductPageListItem from '../component/product-page-list-item'
    export default {
        components: { ProductPageListItem},
        data () {
            return {
                dataList: [],
                inputSearchValue: '',
            }
        },

        options: {
            styleIsolation: 'shared', // 支持样式穿透
            virtualHost: true   // 取消 父组件 引用 子组件 添加一个虚拟的 父节点
        },
        methods: {
            // 考虑又时会有 tab 切换,所以通过loadData 来重置,则页面不能 自动执行 queryList 方法  通过 :auto="false" 关闭
            loadData (item) {
                this.inputSearchValue =item.inputSearchValue
                this.$refs.paging.reload();
            },
            async queryList (pageNum, pageSize) {
                let params={
                    pageNum,
                    pageSize,
                    wlName:this.inputSearchValue
                }
                const res = await this.axiosApiFormdata('/operation/product/list', params, 'GET')
                if (res && res.code === 200 && res.rows) {
                    this.$refs.paging.complete(res.rows);
                } else {
                    this.$refs.paging.complete(false)
                }
            },

        }
    }
</script>
瀑布流
原来组件下载:https://ext.dcloud.net.cn/plugin?id=7594
瀑布流结合 z-paging 使用,最好设置 z-paging :auto="false" 手动调用 queryList 否则联系调用 queryList 会导致瀑布流异常
父组件
<template>
    <view class="whp100">
        <z-paging :fixed="false" ref="paging" v-model="dataList" @query="queryList" :auto="false">
            <product-page-list-item ref="waterfallsFlowRef" :value="dataList" key="page" />
        </z-paging>
    </view>
</template>
<script>
    import ProductPageListItem from '../component/product-page-list-item'
    export default {
        components: { ProductPageListItem},
        data () {
            return {
                dataList: [],
                inputSearchValue: '',
            }
        },

        options: {
            styleIsolation: 'shared', // 支持样式穿透
            virtualHost: true   // 取消 父组件 引用 子组件 添加一个虚拟的 父节点
        },
        methods: {
            // 考虑又时会有 tab 切换,所以通过loadData 来重置,则页面不能 自动执行 queryList 方法  通过 :auto="false" 关闭
            loadData (item) {
                this.inputSearchValue =item.inputSearchValue
                this.$refs.paging.reload();
            },
            async queryList (pageNum, pageSize) {
                let params={
                    pageNum,
                    pageSize,
                    wlName:this.inputSearchValue
                }
                const res = await this.axiosApiFormdata('/operation/product/list', params, 'GET')
                if (res && res.code === 200 && res.rows) {
                    this.$refs.paging.complete(res.rows);
                    this.$refs.waterfallsFlowRef.addData(list,pageNum==1); // 瀑布流方式加载 数据
                } else {
                    this.$refs.paging.complete(false)
                }
            },

        }
    }
</script>
子u组件
<!--首页产品列表-->
<template>
    <view class="page--content-wrap ">
        <custom-waterfalls-flow ref="waterfallsFlowRef" :value="list" :column="2" :columnSpace="1.5" :seat="2" @wapperClick="wapperClick" @imageClick="imageClick" @loaded="loaded">
            <view class="img-wrap-content" v-for="(item,index) in list" :key="item.indexx" slot="slot{{item.id}}">
                <text class="img-wrap-title long_omit line-interval">{{item.wlName}}</text>
                <view class="outer img-wrap-remark line-interval">{{item.productRemarks}}</view>
                <view class="img-wrap-row" >
                    <text v-if="item.priceType == '1' "><text class="bold_mark">¥{{item.price}} </text> / {{item.unitName||''}}</text>
                    <text v-else style="color: #757272;">沟通议价</text>
                </view>
            </view>
        </custom-waterfalls-flow>
    </view>
</template>
<script>
    export default {
        data() {
            return {
                defaultImg: this.$static_url + '/statics/app/home/thumbnail.png',
                firstLoadFlag:true,
                list: [],
            }
        },
        options: {
            multipleSlots: true // 在组件定义时的选项中启用多slot支持
        },
        created() {

        },
        methods: {
            /**
             * 瀑布流数据加载
             * @param list
             * @param resetFlag:刷新是传递true(tab切换,下拉刷新)
             */
             addData(list,resetFlag) {
                if (resetFlag) {
                    this.list = []
                }
                this.list.push(...list);
                 this.$refs.waterfallsFlowRef.addData(list,resetFlag);
            },
            loaded() {
                console.log('加载完成')
            },
            wapperClick(item) {
                console.log('单项点击事件', item)
            },

            imageClick(item) {
                console.log('图片点击事件', item)
            },
            onErrorImg(item){
                item.image = this.defaultImg;
            }
        }
    }
</script>

<style lang="scss" scoped>
    .page--content-wrap{
        .img-wrap-content{
            padding:10px;

            /* 行间个*/
            .line-interval{
                margin-bottom:10px;
            }
            .img-wrap-title{
                font-size: 14px;
                font-family: Source Han Sans CN-Medium, Source Han Sans CN;
                font-weight: 500;
                color: #333333;
            }
            .img-wrap-remark{
                font-size: 12px;
                font-family: Source Han Sans CN-Regular, Source Han Sans CN;
                font-weight: 400;
                color: #999999;
            }
            .img-wrap-row{
                font-size: 12px;
                font-family: Source Han Sans CN-Medium, Source Han Sans CN;
                font-weight: 500;
                color: #F9343B;
                .bold_mark{
                    font-size: 20px;
                    font-family: Roboto-Bold, Roboto;
                    font-weight: 700;
                    color: #F9343B;
                }
            }

        }
    }
</style>
异常记录:
1. 提示:启用组件按需注入
https://www.zhuige.com/index.php/news/581.html
微信小程序:开启【按需注入】非常简单,只需要在app.json中添加:
uniapp开发 :manifest.json->源码视图中添加相应配置即可
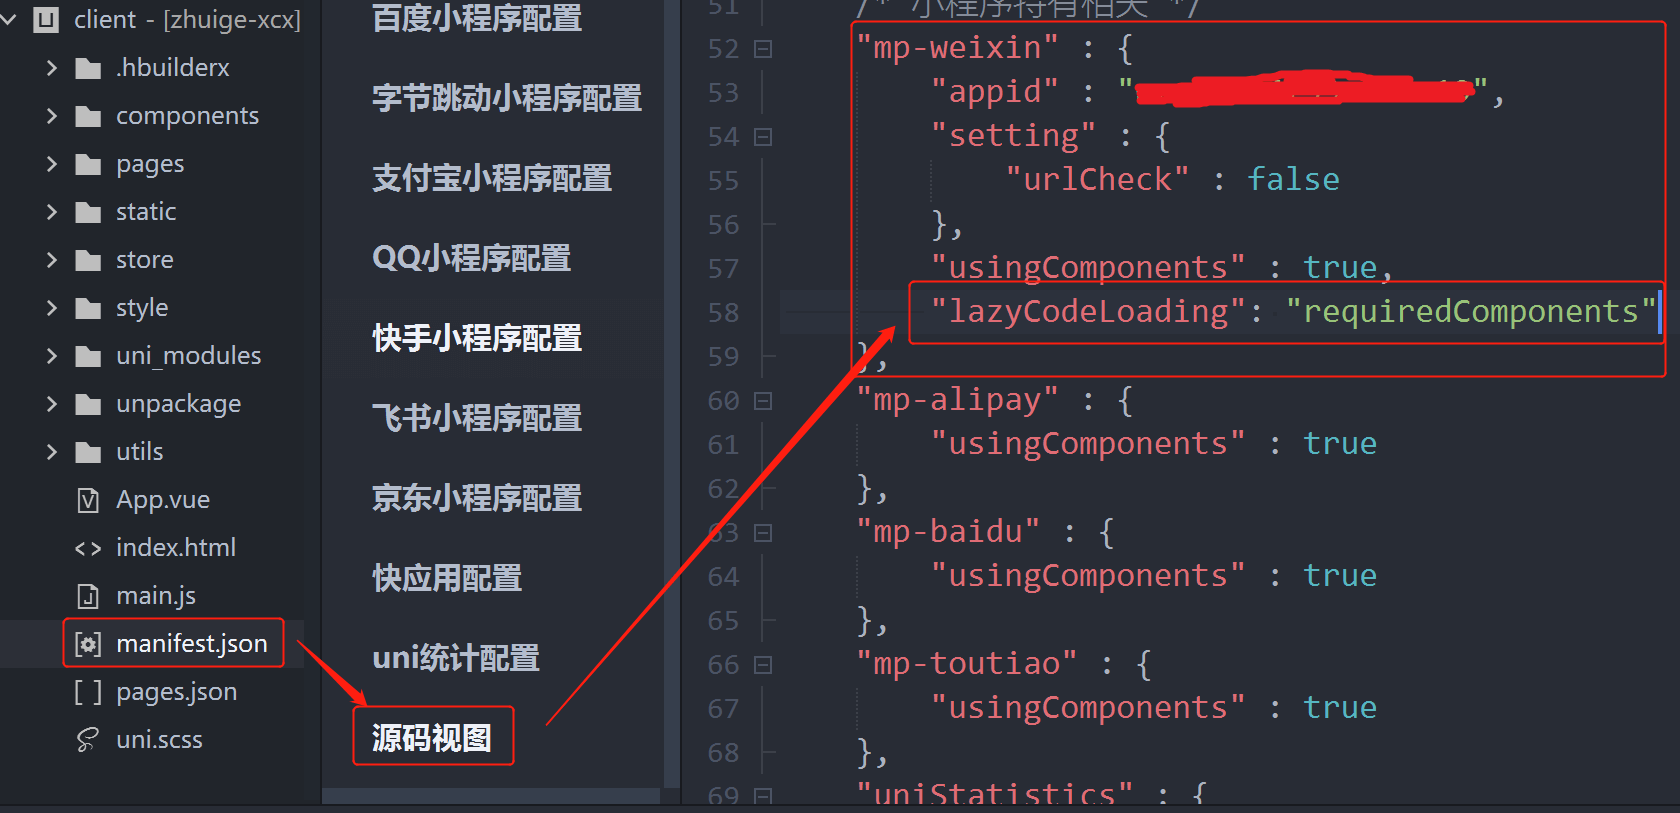
启用组件按需注入
删除的文件还是提示 启用组件按需注入
大概率是编译问题: 删除
unpackage\dist\dev下的文件,重新编译生成
侧滑删除
自定义 https://blog.csdn.net/qq_36864210/article/details/109047092
<uni-swipe-action>
    <uni-swipe-action-item :disabled="read_only == 1" v-for="(item,index) in dataList" :key="index" @change="changeAction($event,item)" :auto-close="false" :show="item.show">
        <product-list-page-item :read-only="read_only" :item-obj="item" theme="white"/>
        <template v-slot:right>
<view class="left-btn-wrap">
    <view class="left-btn-item" @click.stop="delData(item,index)">删除</view>
            </view>
        </template>
    </uni-swipe-action-item>
</uni-swipe-action>
 changeAction(e,item) {
                // setTimeout(function () {
                this.direction = e
                // }, 3000)
                console.log('返回:', e);
            },
开发时无法debugger
运行开启 压缩代码,会导致 无法debug
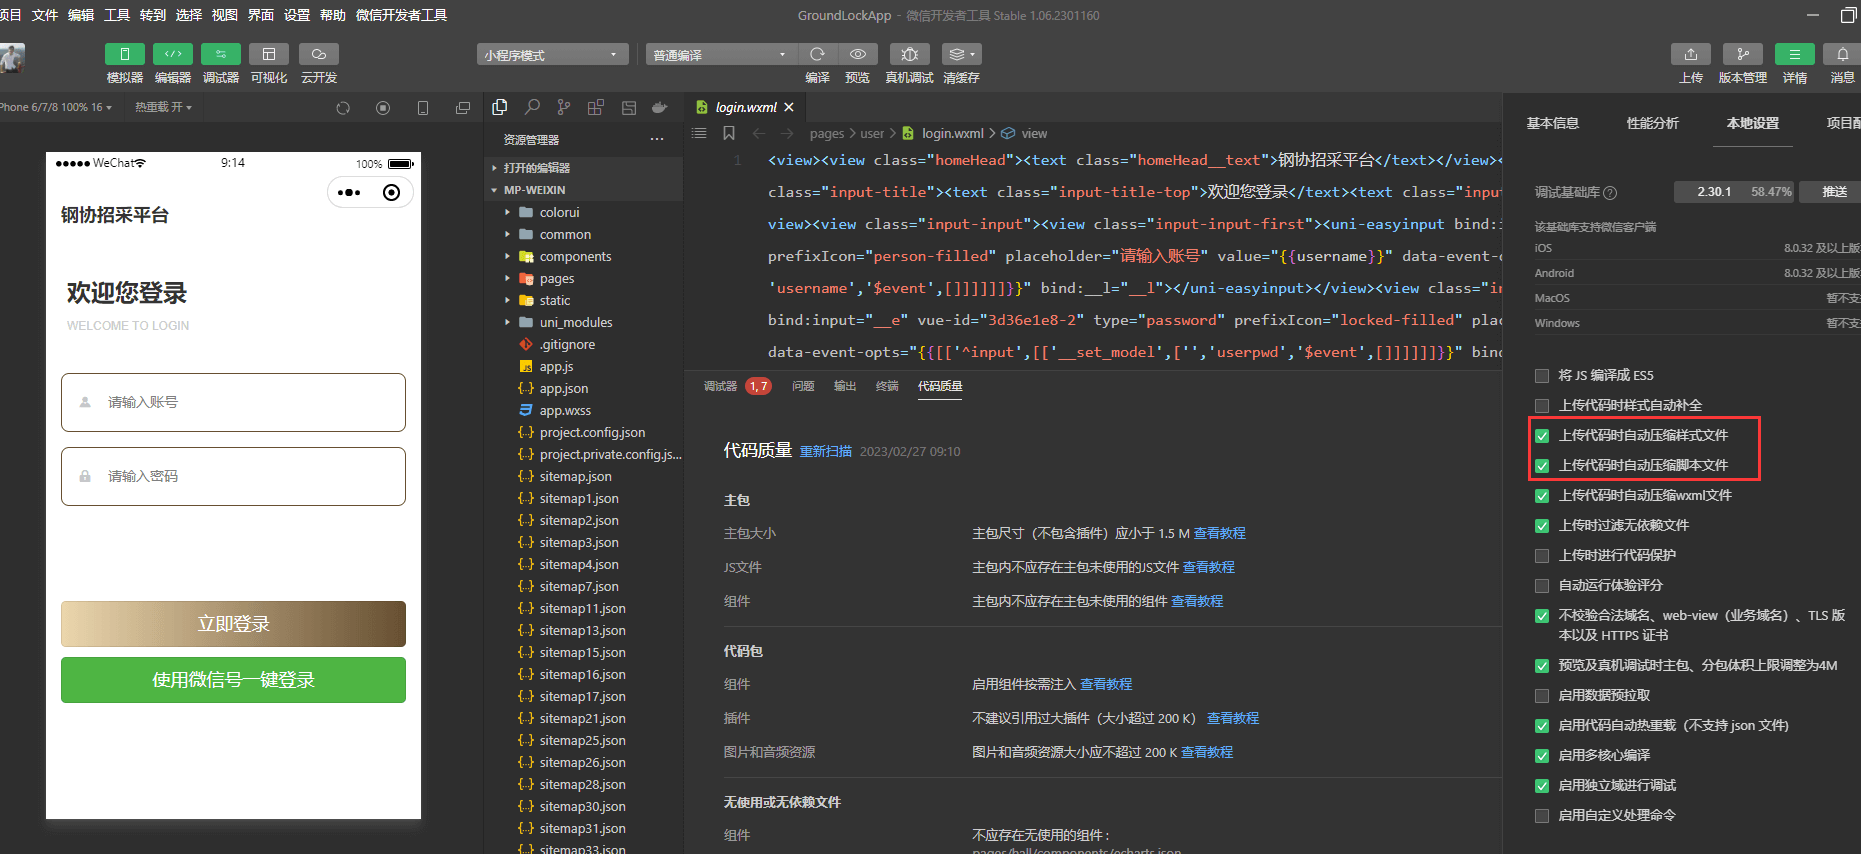
运行==> 运行到小程序模拟器 ===> 运行时是否开启压缩代码
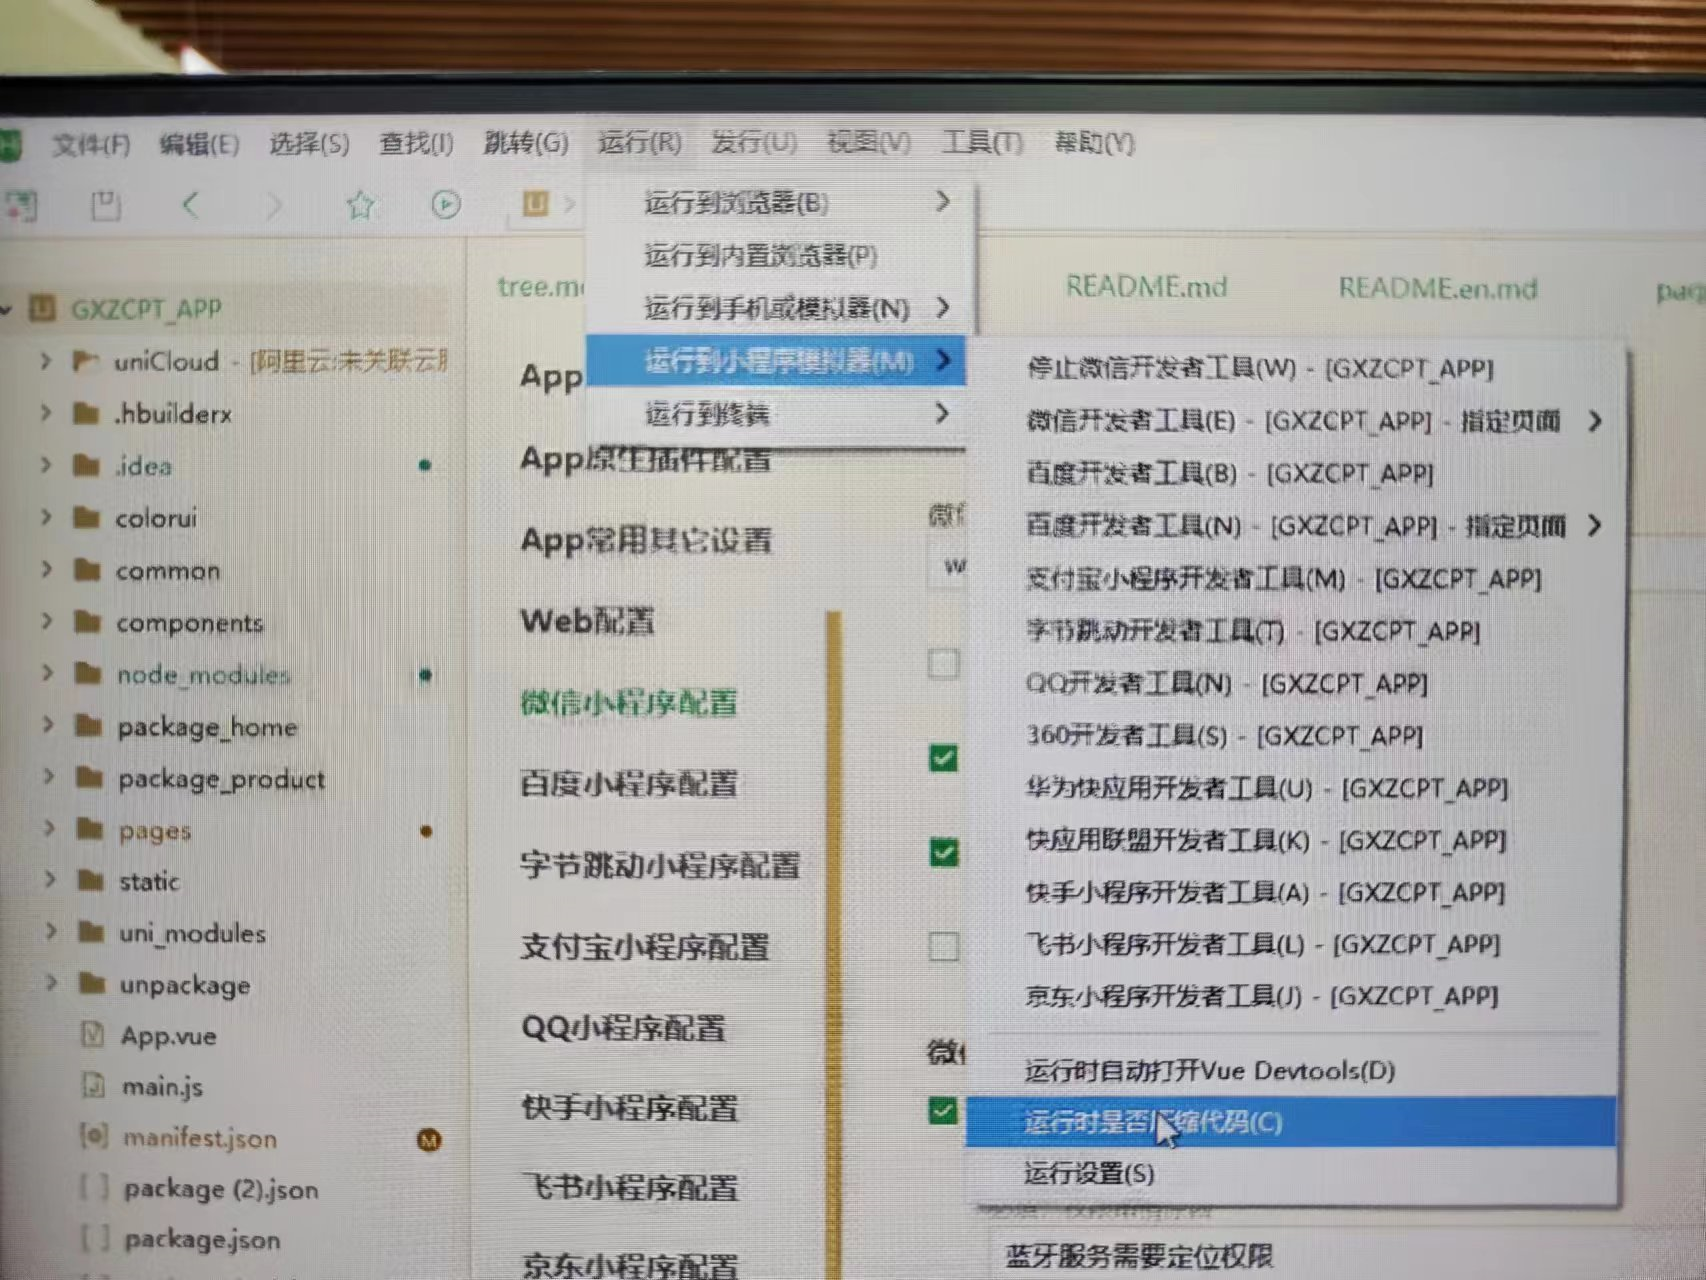
包过大,无法打包问题
1. 开启压缩
这个会影响到无法打包问题
运行==> 运行到小程序模拟器 ===> 运行时是否开启压缩代码
2.开启上传代码压缩
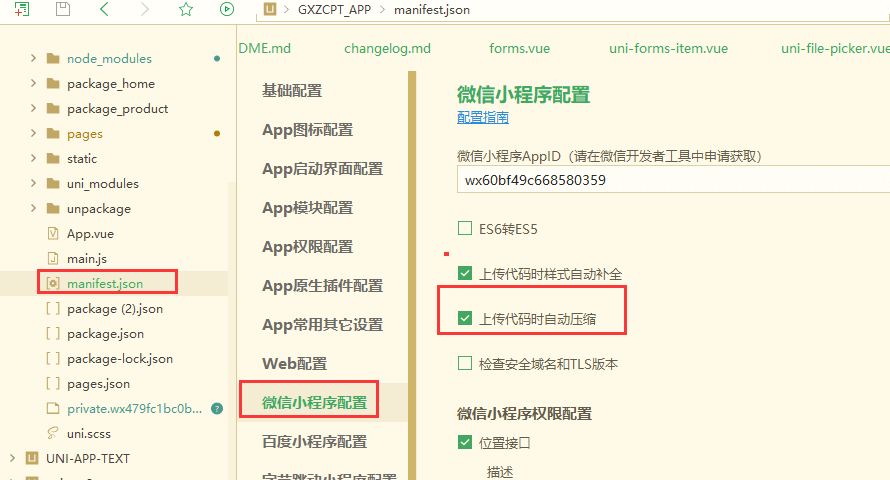
3. 分包
最更本的解决办法,这个最好是初始就考虑到这个问题
长按弹出
//@longtap="showModal('年产值',itemObj.yearOutput)"

showModal (title,content) {
    uni.showModal({
        title: title,
        content: content,
        success: function (res) {
            if (res.confirm) {
                console.log('用户点击确定');
            } else if (res.cancel) {
                console.log('用户点击取消');
            }
        }
    });
},
Uni-APP rich-text富文本中图片宽度溢出的解决办法
Uni-APP rich-text富文本中图片宽度溢出的解决办法
// 富文本部分反解析
UnchangeContent(str) {
if(!str){ return; }
return str ? str.replace(/</g, '<').replace(/>/g, '>').replace(/quot;/g, '"').replace(/<img/g, '<img style="max-width: 100%;"') : ''
},
idea 中开发 uniapp项目 无法识别 @/ 路径如何处理
在项目根目录创建 jsconfig.json:
Json{
  "compilerOptions": {
    "baseUrl": "./",
    "paths": {
      "@/*": ["./*"]
    }
  },
  "exclude": ["node_modules", "dist", "unpackage"]
}
HBuilderX使用
| 快捷键 | 用途 |
|---|---|
| ctrl+p | 全局查找文件 |
| ctrl+alt+f | 查找关键词出现的地方 |
| ctrl+e | 选中当前文件相同的词,同时编辑 |
| ctrl+f | 当前文件内搜索和换出替换 |
| alt+/ | 智能提示 |